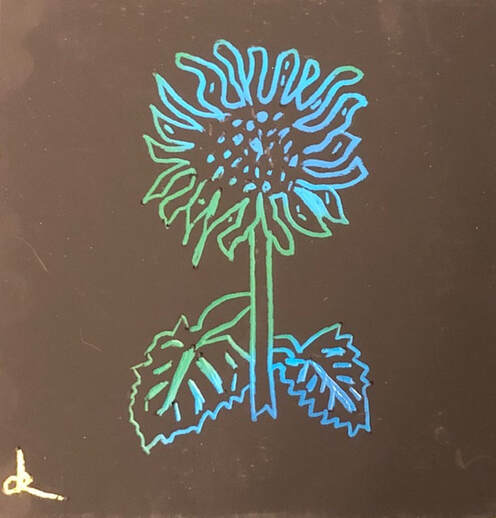
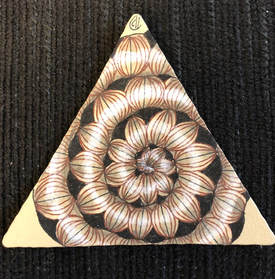
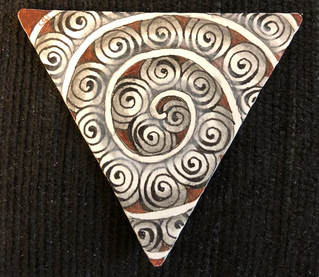
 Drawn on an Art Scratch tile with a wooden stylus. (The idea here is you scratch off the black coating and uncover the shiny colors beneath it). The image is ©Susan Riecken 1979. This was my interpretation. See below. This image adorned the cover of my old 1979 calendar, one of the many I bought annually from rubber stamp artist Susan Riecken, who seems to have disappeared; I can't find any online presence for her and the last calendar I was able to get from her was in the early 1990s. After that she closed her Cambridge studio and I couldn't find a trace of her. Here is the actual cover of that calendar: 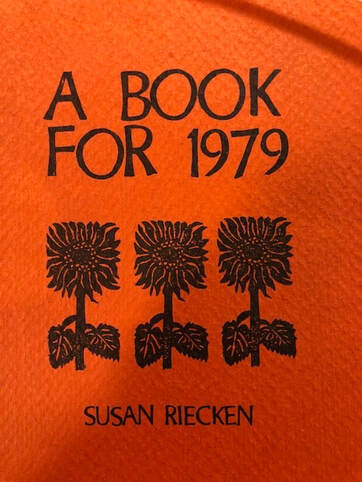 I completely adored her work. Each calendar was a labor of love. She carved the stamps from erasers and in the early years I *think* she hand-stamped each calendar, though I'm not sure. Pretty soon she had the hand-stamped pages reproduced so that she could produce the calendars in bulk, but that never interfered with the delicious colors or the funky marvelous designs. She was/is an art idol of mine. Wishing her well wherever she is, and hoping she's well and happy and making more art, even if I cannot find her.
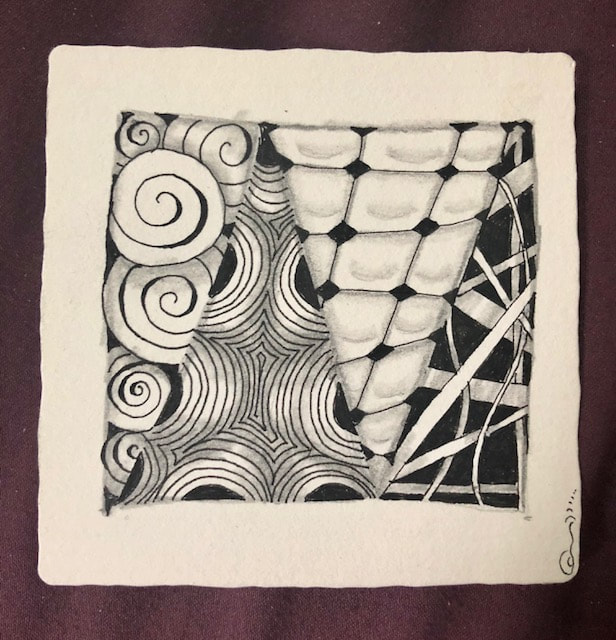
About my interpretation/copy of her sunflowers: I knew when I ran across this calendar the other day that I wanted to try making a "stamp-like" design by scratching away on an Art Scratch tile. Using a wooden stylus would, I thought give the same chunky effect as a carved stamp. I think I was right. 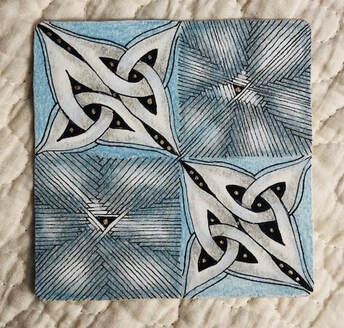 Tangles: Trinity and Balloya. Blue Chalk Pencil, Micron 01 and 08 in black, Gold Gellyroll, White Chalk Pencil. First try at the Trinity (the Celtic-Knot appearing tangle) and Balloya (the one with the multiple lines). I enjoyed doing both, and could certainly get better at both with practice. Why did I choose these two? Because they both began with triangles. But never mind that. Look what just arrived from my kind and unbelievably talented friend AE. She MADE this. Since I can sew but only very badly, this boggles my mind. She sews like a pro, weaves wonderful things, beads exquisite pieces, does punch needle rugs, dyes her own yarns, and I know I'm forgetting other talents. And all of it beautifully. I love this! Am I lucky or what?  A good friend who is also a CZT (Certified Zentangle Teacher) was here this week and stayed long enough for both of us to take the same online class via the TangledYogi--aka Romi Marks, a very good teacher. I'd encourage you to check out her work, including her YouTube videos. Below you will see our results. The first two are mine--think of them as Draft 1 and Final. Here is the draft: 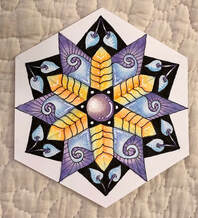 Romi refers to this as the "Aloha Waves" piece. The design is hers, but drawn by me, and then the color choices are mine. In a moment you can see the final result below, once I'd had time to mull this one over. I hope you can see what I added. The piece was done on one of Romi's hexagonal tiles, which are available on her website (see the link at the top of this email). She has them made from high-quality card stock and they are very smooth and accept colored pencil well. They are also larger than the standard Zentangle® tiles (made from Fabriano Tiepolo printmaking paper, softer and tooth-ier). The two most recognizable tangles here are Pokeleaf and Crest, along with a Zengem. My finished piece is below, and then below that one you can see the gorgeous result of my friend's work. Two identical tiles, drawn by two different people, with two completely different coloways. 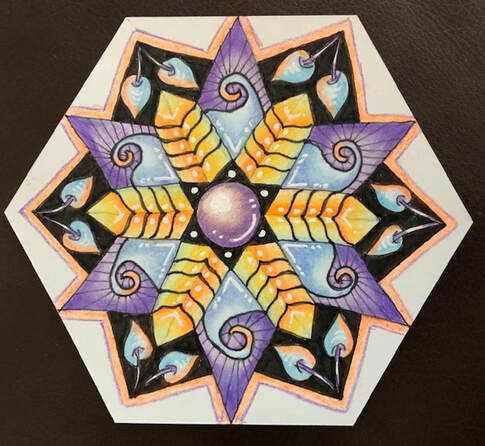 Above is the completed version of the one I did. Below is the tile done by AE in the same class. We were drawing together during class, hearing and seeing the same instructions. Yet if you look you'll see slight differences in mine (above) and hers (below). Zentangle® is just like handwriting. The same tangle drawn by two different people will always be a little (sometimes a lot) different.  Drawn and colored by my buddy AE. This was her first-ever ZenGem! Didn't she do a terrific job on it and on the whole tile--and these aren't her usual colors, just the colors she had with her to choose from. Photo credit to AE, used with her permission. But wait--there's more. She also decided to take up punch hooking and got her equipment together while she was here, designed a piece, and began punching. I can't wait to see what she produces.
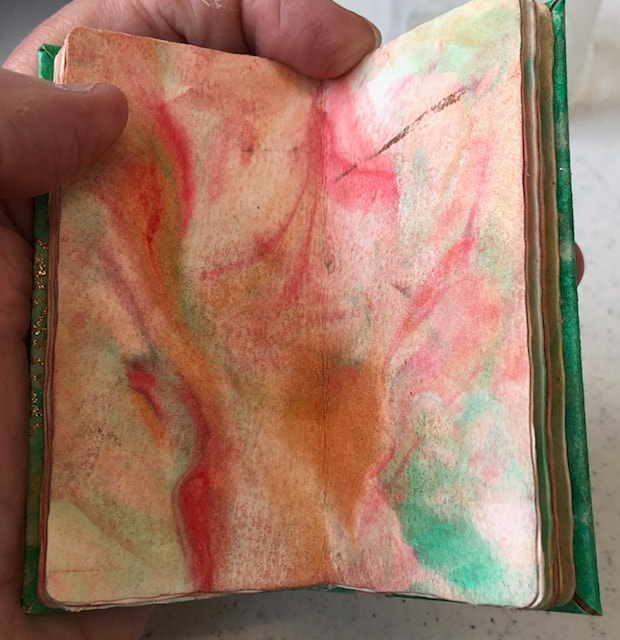
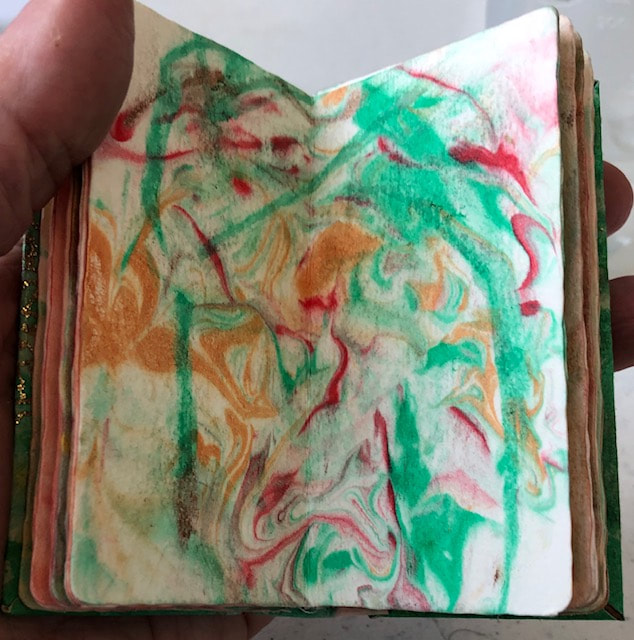
The good news for me is that I think I'm about to start work on another rug and have something textile-related to show soon. It's been too long. A lovely calming meeting today with rug hooking friends Diana, Lynda, and Judy. 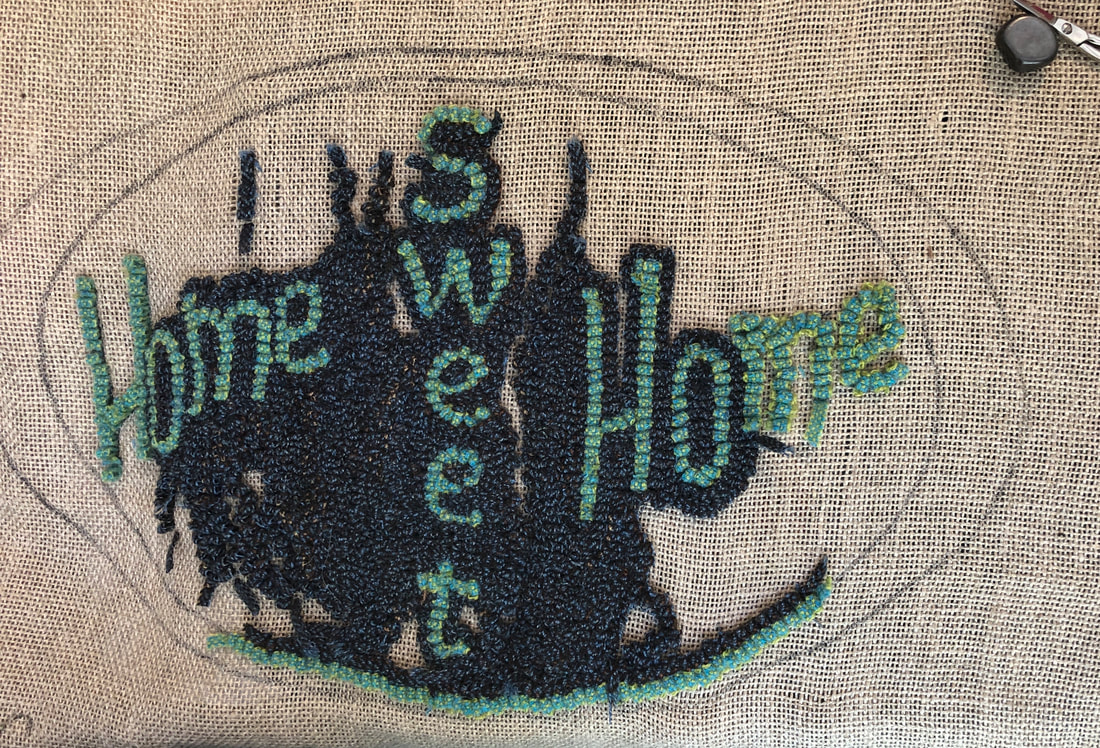 A Liziana creations design, wool on linen. Diana was working on this and it will be for sale in November. It's 11x18". 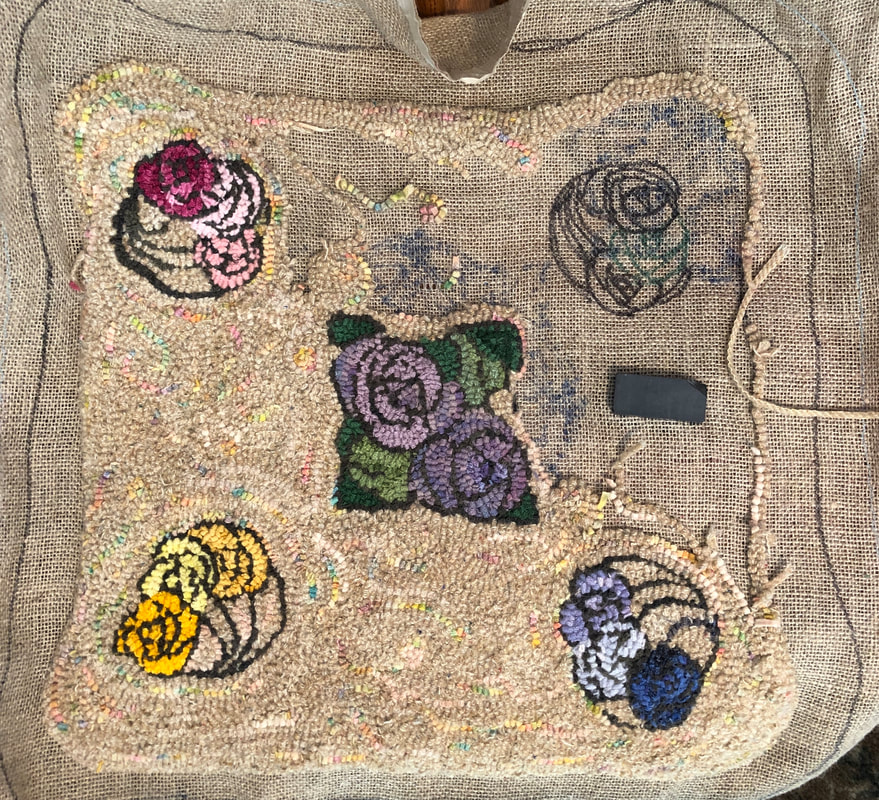 Lynda designed this and it should fit perfectly on the top of a footstool in her house. A simple design made even more lovely by the subtly colorful background. Wool on linen. 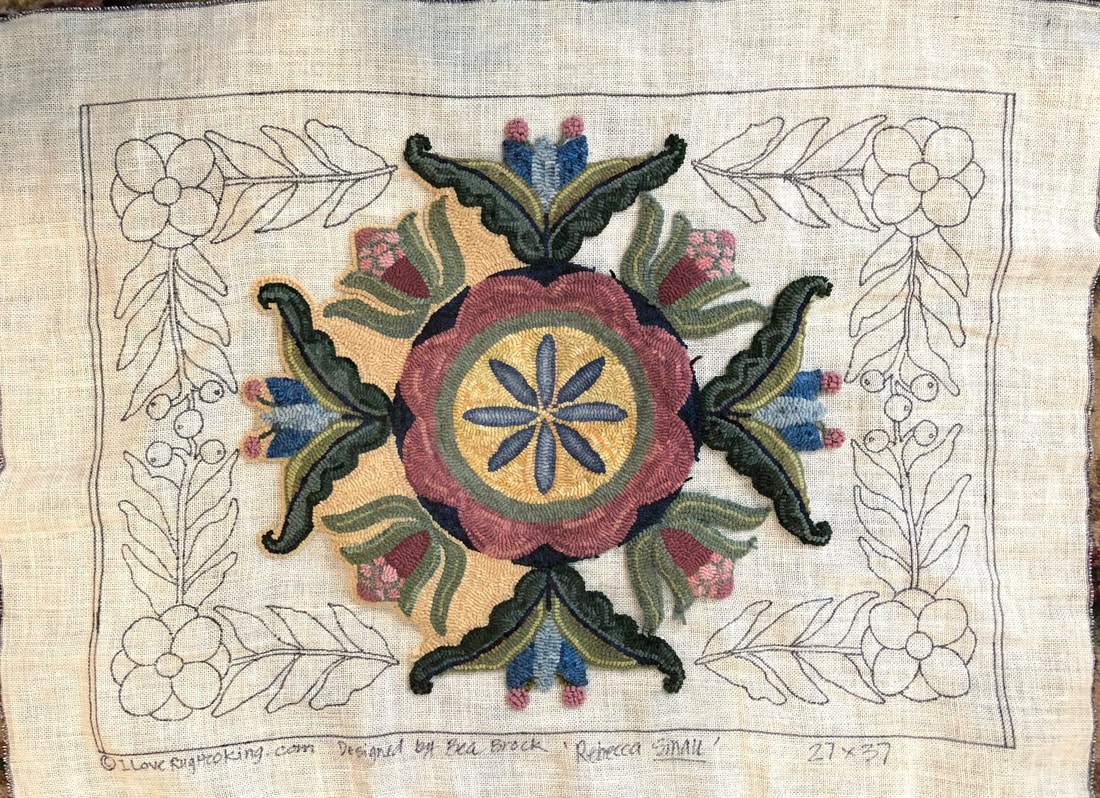 This beauty is a Bea Brock design called "Rebecca Small," 27x37". Colors and hooking by Judy J. Wool on linen. 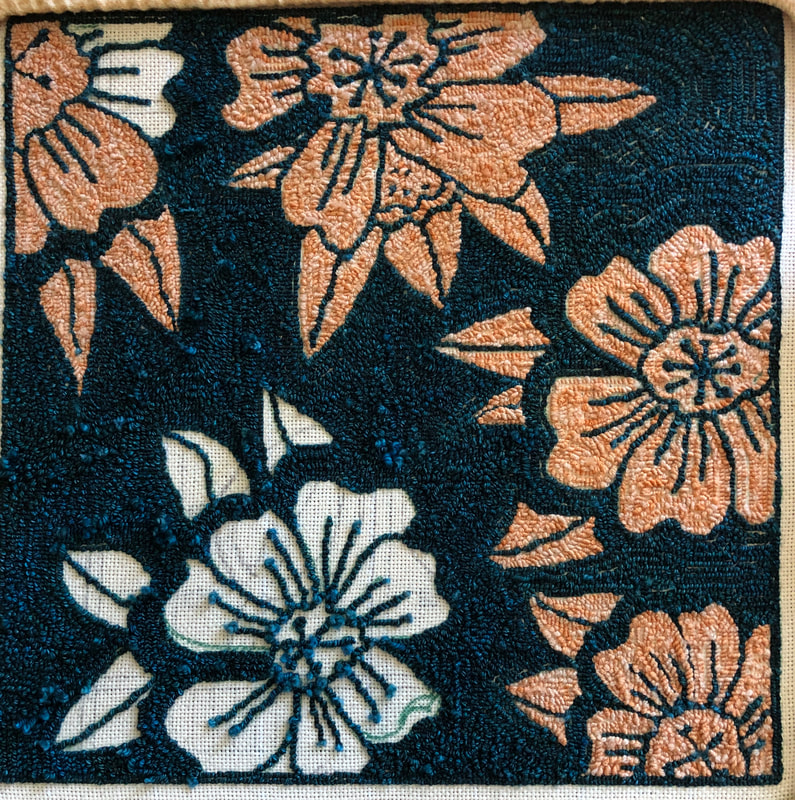 Rug-Punched Pillow in progress; loops that are popped up will be pushed thru and trimmed on the other side. This is my current punch project. Wool on monks cloth. Actually, make that utter shock. I went to Elaine Huffman's studio today for a "Bitty BookZ™ maker event," thinking I would pick up a lot of tips from those more experienced. Imagine my surprise when I discovered none of the other 5 participants had ever made a bitty book. I was even more surprised to end up in the role of teacher for this group. Without any planning or rehearsal. ("Planning" and "Rehearsal" are my two middle names.) Elaine could have taught the class--but she gave us her studio for the day plus fabrics and all the other supplies...and while we worked, she was madly cutting things for us in the background. Without Elaine, none of this would have happened. So what did happen? This: 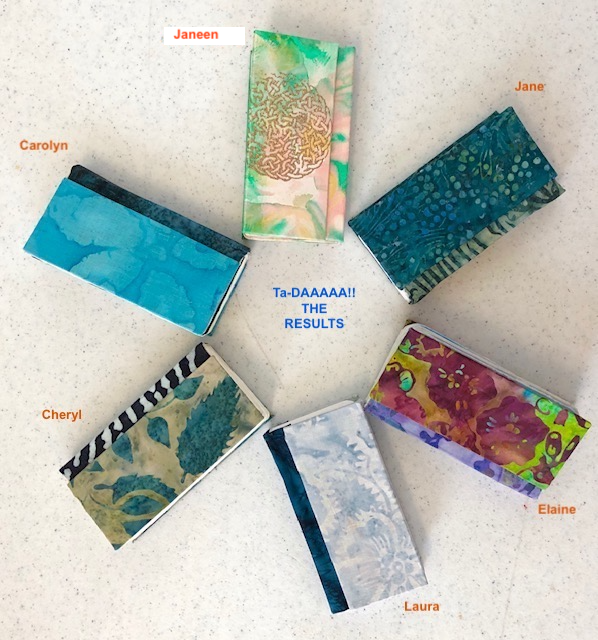 These are the finished FIRST-EVER BOOKS from all five participants, plus Elaine's. Pretty impressive! And below is a view from the side, so that you can see them slightly open:  These are just stunning. What a talented group. See below for a couple of pictures of the books as they move thru the stages of creation: 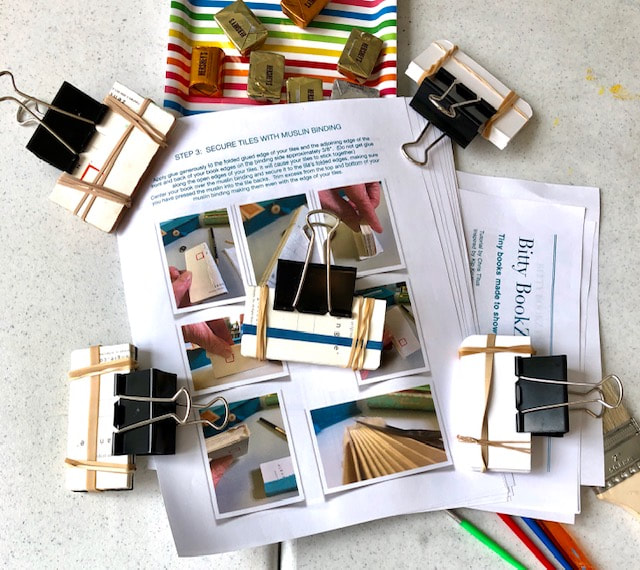 First stage with the tiles just glued together and clamped for a bit to dry. They are sitting on Chris Titus's helpful pdf of directions. See below for where to get her pdf if you would like to try one. And yes, those are chocolates at the top of the photo. Surprisingly, people were so absorbed that I never saw anyone eat one... On to the next stage: 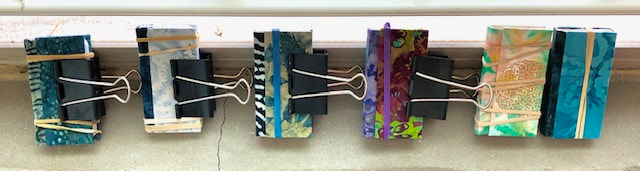 Nearly finished books on the windowsill in the studio, clamped & "elastic-ed" in order to dry. Nearly finished books on the windowsill in the studio, clamped & "elastic-ed" in order to dry. And here below we have the entire group after their books were dry and we got to un-clamp and un-elastic them. From left to right are: Janeen, Jane, Carolyn, Cheryl, Laura, and the scamp at the bottom in the violet shirt is Elaine herself. Elaine deserves huge applause for enabling this to happen. 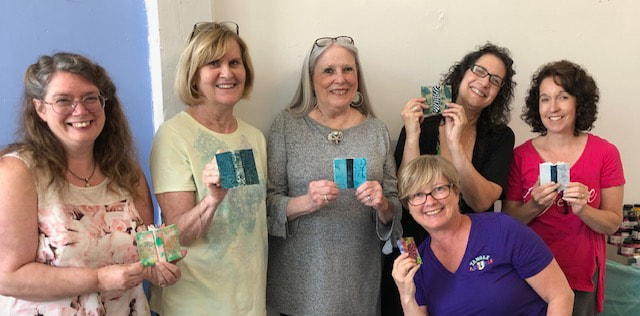 Interested? If you'd like to try it yourself, you can get Chris Titus's very helpful pdf describing what supplies are needed and how to do these from start to finish. Click HERE to get the pdf ($10 US funds...well worth it). You really CAN do this without a class, just from the pdf. Take it slow, expect some mistakes along the way, and don't expect perfection from your first one. But by the time you make the 2nd one, not only will it go faster, but you'll have it totally figured out. Meanwhile, Janeen (a Certified Zentangle Teacher from Seminar 3!!!) filled her Bitty Book with ten of her own paper pages which she had made using the ever-popular "Shaving Cream" method of coloring and marbleizing the paper. It's all over YouTube--just type in shaving cream + paper. Here are a few of her tiles (now inside her beautiful book):
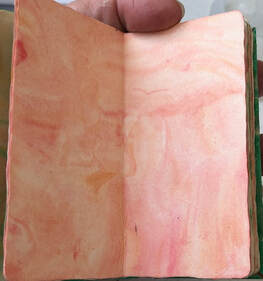 Just waiting to be tangled! Janeen had a funny story about wanting to show her grandson how to color papers with the Shaving Cream method. Except, her grandson had been doing it for years in his school and HE ended up giving HER tips and hints.
Of course, you can use plain white or black or tan tiles for your own book, or you can take your already-completed tiles (ones you've already tangled) and use those for your pages. The possibilities are endless. There is a Facebook page for BittyBookZ (oriented towards people who do Zentangle®); it's a closed group but you can ask to join if you want to join the fun. 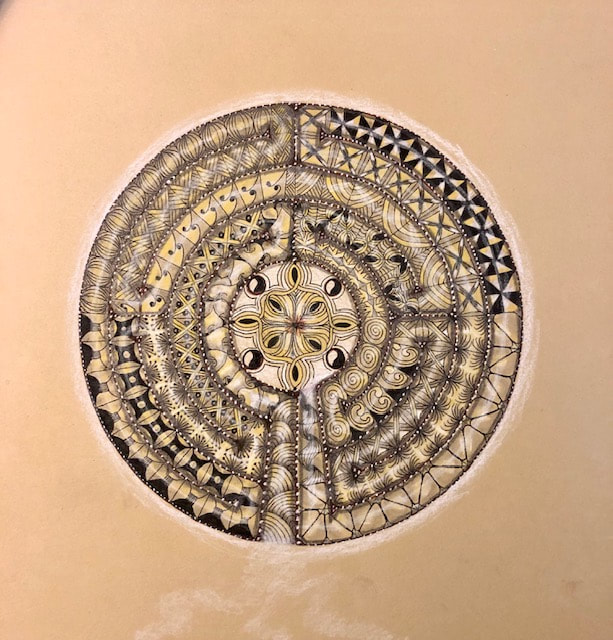 Done on a ten-inch square tan Opus Tile with brown and black Micron 01s, General's colored chalk pencils, white gellyroll pen, and mucho graphite. Completed over several days for the #zenuari2018 project day 20, "Maze." (This is not a maze; it's a labyrinth--they are two different things but often incorrectly used as synonyms.) It's been that kind of week--labyrinthine. So many twists and turns. We keep walking and we trust we will find our way in to the center and then out again on this challenging journey. I hope we are in the center now and will soon find our way out to resume our lives. I am still far from home, helping out my friend who is receiving daily treatments. She is close to the end, however--only three more and she will be done and we will return to our respective homes. A huge complicating factor has been the sudden illness of someone in her family; it certainly has increased the pressure on her to finish here and go home. There is much uncertainty. And yet, we know we just need to keep walking along on the path before us, and trust we will get where we need to be. In fact, we are already where we need to be, and we just need to remember that. It took me a few days to do this piece as it's so large. I learned a lot in the doing and will try again for better results. My friend also tangles and finds it therapeutic as she waits for appointments. She is talented and here is one of her latest efforts, a Zendala done on a tile which she had pre-treated with a Fine-Tec paint gold wash. Isn't this spectacular? (I have her permission to publish this photo) 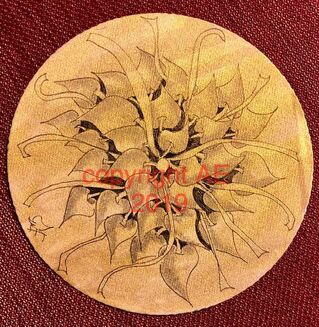 This tile was done by my friend AE, not by me. I would love to claim it! I love it. Those metallic Fine-Tec watercolors are so inspiring. "A labyrinth is a symbolic journey … but it is a map we can really walk on, blurring the difference between map and world."
— Rebecca Solnit, in Wanderlust: A History of Walking Away from home in this very cold midwinter week, I've been doing just a little tangling. And watching a good friend do her weaving. While yet another good friend sent me a wonderful photograph. Below are my latest tangles, my friend's weaving, and my other friend's photo. Enjoy. 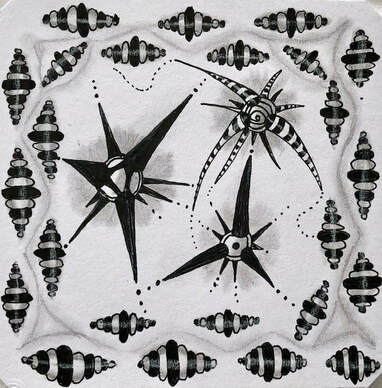 An experiment on a Strathmore tile. Both tangles are entirely new to me. The border is Qua-Sahnt by HKTangler; the center tangle is Spikor3 by CZT Jutta Gladnigg of Germany. Micron 01, graphite, white chalk. 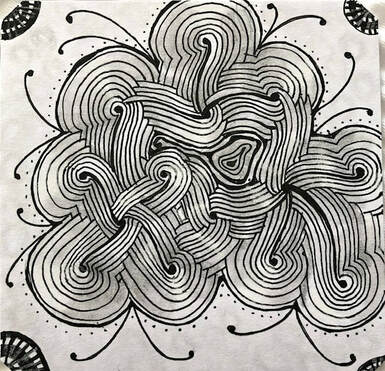 Another experiment with the XLNT tangle by Jody Genovese, CZT. Done on a Strathmore tile with Micron 01, graphite, chalk. Below is my friend's weaving--two "mug rugs" for my coffee cups. Love the patterns and subtle colors she chose, and I feel lucky to have these gifts! 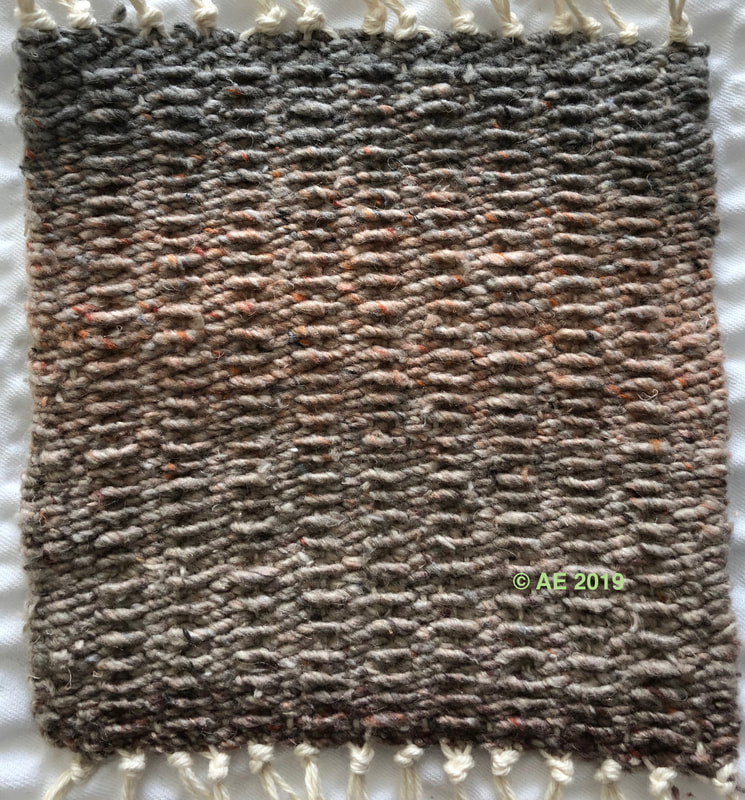 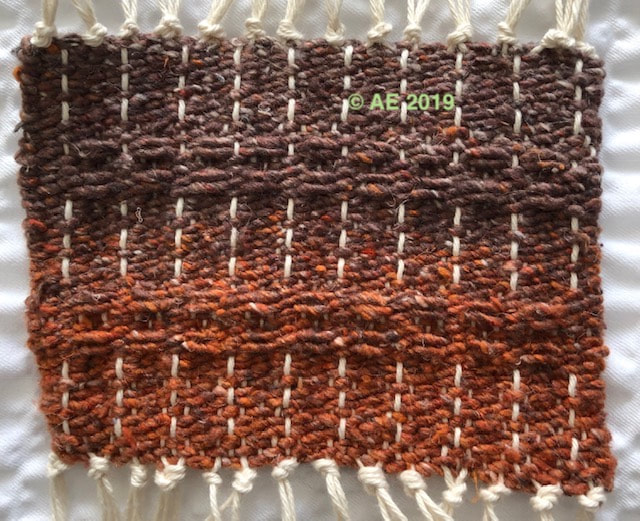 Finally, this wonderful Currier & Ives-type photo taken by a good friend who was out on a walk during a snow squall near our homes last week. Is this not beautiful? 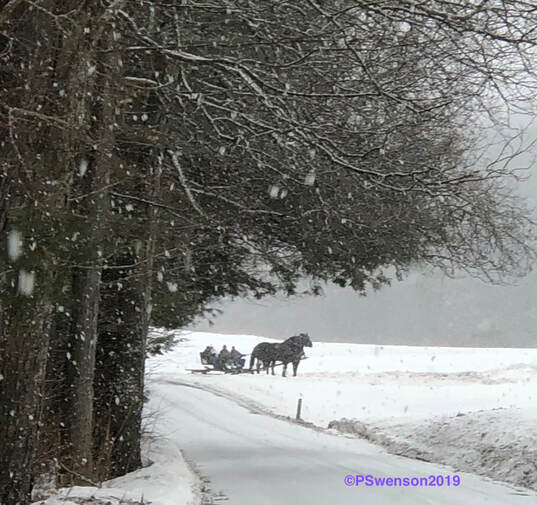 "Silence is true wisdom's best reply."
--Euripides Here's another short post on OTHER PEOPLE'S WORK (not mine). My buddy Cheryl is a Rug Rescuer--she takes partially completed traditionally hooked rugs from people who cannot complete them (usually due to age, illness, or unknown reasons) and finds a way to finish them. She's a genius at it! Here are a couple of her rescued rugs, then a 3rd rug that she hooked NOT as a rescue but just for fun for a grandchild. And finally, a rug in progress from another wonderful rug artist, Cynthia (not a rescue--her own design). 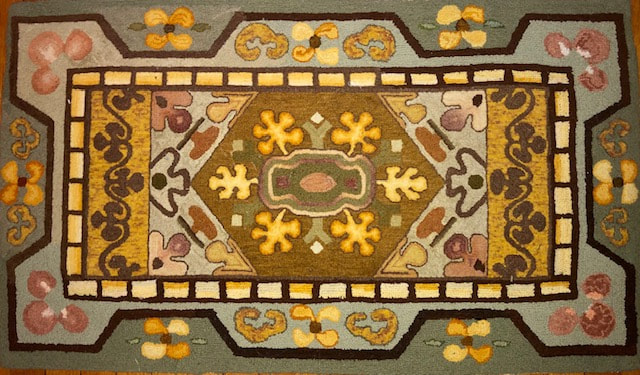 I believe this pattern is an old McGown or Moshimer pattern called "Frost Oriental," (after Edward Frost, an itinerant peddlar in the 1800s who figured out a way to transfer rug designs to burlap). Cheryl rescued this rug and finished it--I've long loved this pattern and have often thought of hooking it, but haven't gotten around to it yet. Love what she and the original artist did with this! 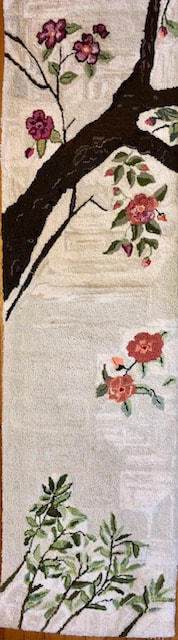 Also by Cheryl the Rescuer. Although I can't remember if she rescued this rug and finished it, or if she decided to hook it all herself and then ran out of wool part of the way through and had to scramble to finish. Either way, I love this rug. Both the pattern and the wonderful difference in values, giving it an antique look. 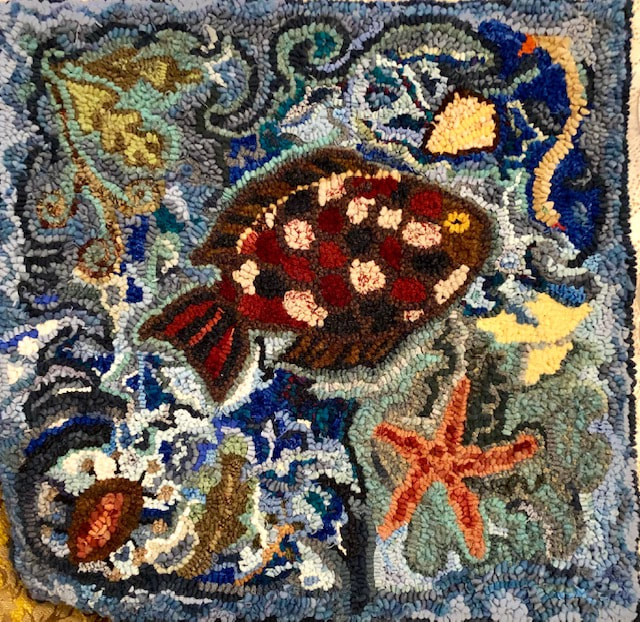 Also by Cheryl the Rug Rescuer, but NOT a rescued rug. She hooked this in a wide-cut for her grandson. I forget whose pattern this is but I love it and love the colors she chose. This may be her first wide-cut rug. 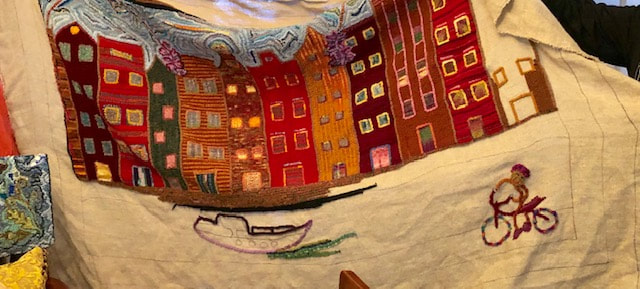 And last but not least, a rug by Cynthia (another traditional rug hooking artist in our group) of her own design. This isn't the first time I've featured one of Cynthia's rugs--she does all her own designs and dyes or recycles the wool she uses. The added bicyclist (lower right without any wool around it yet) and the boat (lower left center) both have special meaning for her family. She does wonderful work. I got to see these lovely rugs, and others, at our meeting last Friday. It was hard to tell which was more fun--the rug hooking, the conversations, or the fabulous groan-inducing foods. We met at Cheryl's amazing and stunningly decorated old Victorian house. "When life gives you hands, use 'em to make stuff."
--Anon. None of these are my work. But I am a sucker for lotus flowers, and these are so stunning I have to share them. First is a photograph taken by Paula Swenson at a botanical garden in Thailand:  I am in love with that photo. Next, two images of lotuses in watercolor painted by Walter Cudnohufsky of Ashland MA: 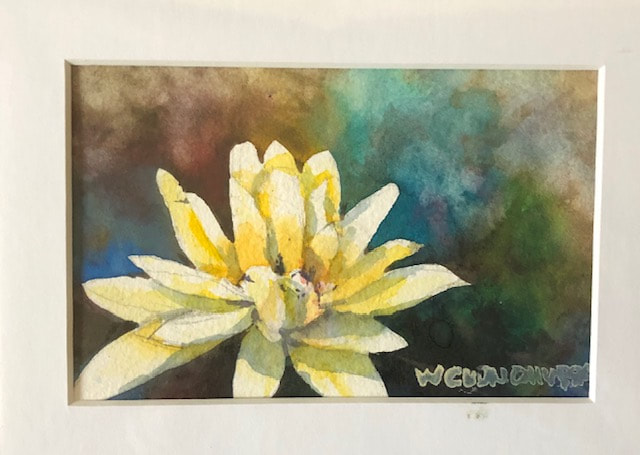 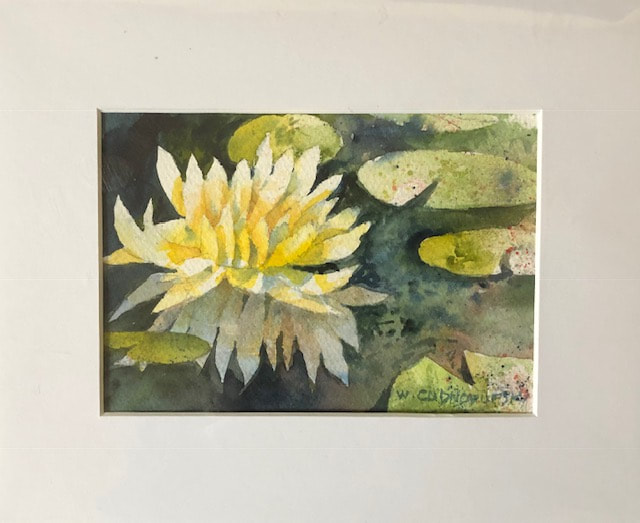 I'm lucky enough to own both of these paintings.
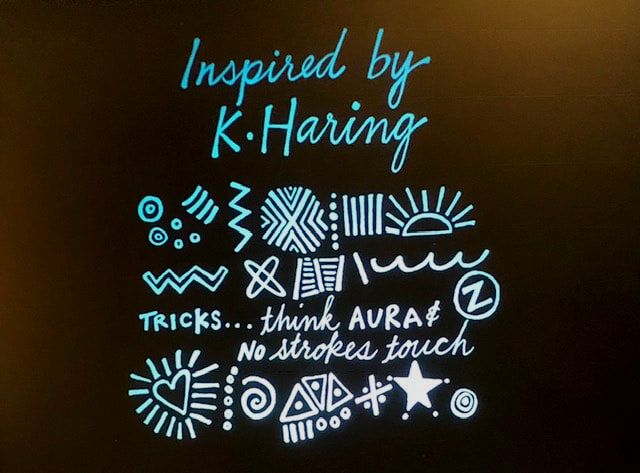
They will help me to remember... "No mud, no lotus." --Thich Nhat Hanh Remember the very strange story of the hula girl figure from last August/September ? (click here to refresh your memory) She mysteriously appeared atop our mailboxes one day, stayed a few weeks, then disappeared. But she reappeared in September (it's all in the link above). Here is a photo of how she looked then (just below). But read on to see how she looked as of this morning... 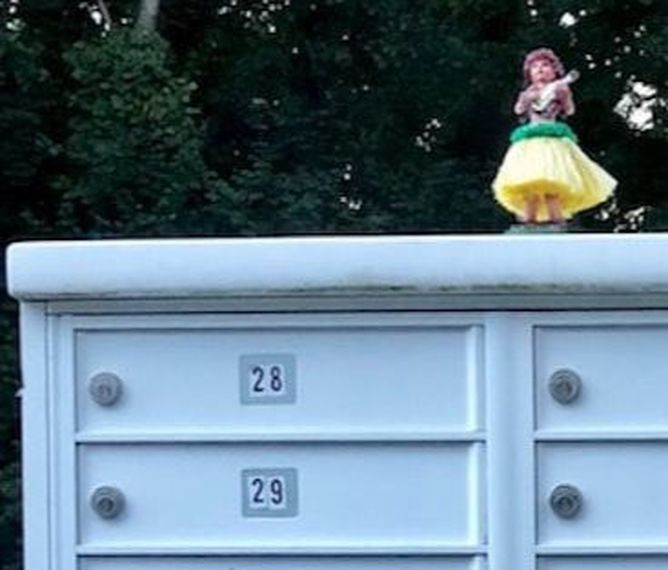 She was appropriately (if scantily) dressed back then. But. Well. It is now November and we have already had two snowstorms...and winter's barely begun. On my way to do some errands this morning I stopped at the mailbox and... I nearly swallowed my tongue laughing when I spotted this: 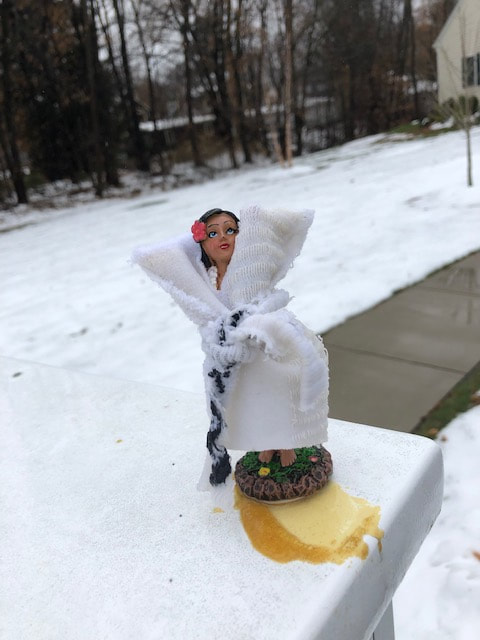 Yes, someone has thoughtfully wrapped her up in a winter robe. Once again, no one has taken responsibility for this hilariously pointless random act of kindness. I love it. A few days ago, I shared a post called "Inspired By Others," in which I showed some work done a la Ernst Haeckel at our recent zenAgain2018 conference. We didn't stop there, however, and today's post shows two very different artists whom we also explored. Talk about crazy fun--this was a highlight of the conference for me. KEITH HARING Indeed, Keith Haring, one of Molly Hollibaugh's favorite artists when she was a child. After wondering what, if anything, we could do with tangles and his work, Molly experimented and came up with this instruction at zenAgain2018, and below you see the tile I did as a result. I was SO surprised - and delighted - by this choice of artists!
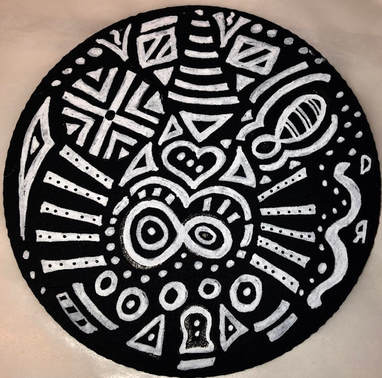 My own version of a Keith Haring-style tile. Was this ever fun to do! Done on a black Zendala tile with White Gellyroll pen #10. Permission to break all the rules here, and just have a good time. And if that alone wasn't enough, have a gander at the mosaic below. Bear in mind that this is only a partial photo of the whole mosaic. Prepare to drool. 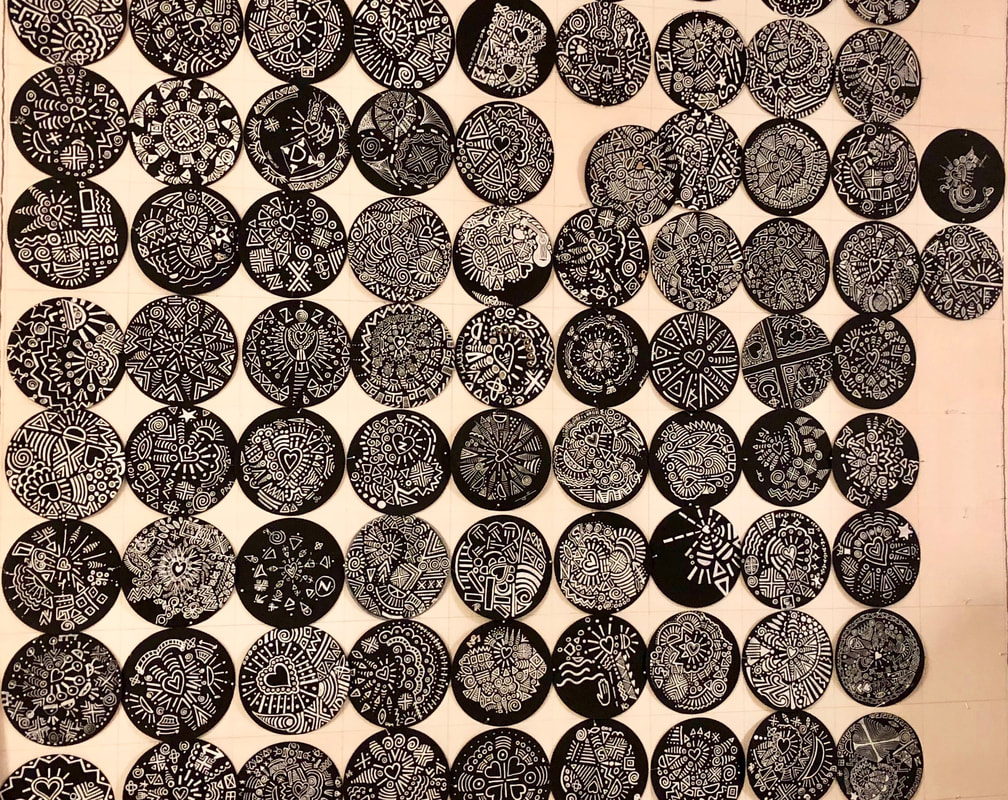 But wait--that's not all we did. The next tile couldn't be more different. (As is true for the "Ernst Haeckel-style" tile we did which I presented a few days ago) GUSTAV KLIMT Yes indeed, Master Klimt himself. I couldn't do him justice--none of us could, really, but we all gave it our best shot and my tile's below, along with a partial picture of the group mosaic. 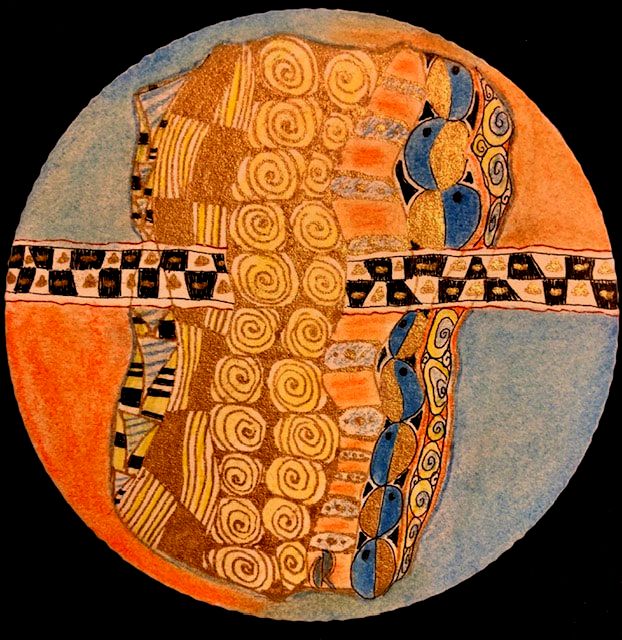 This was my tile. Yes, that is some Gold Gellyroll in there, along with black and brown micron 01s, and Generals Colored Chalk Pencils. This is truly only a very small portion of the class mosaic, enlarged so that you can see the detail and the contrasts. 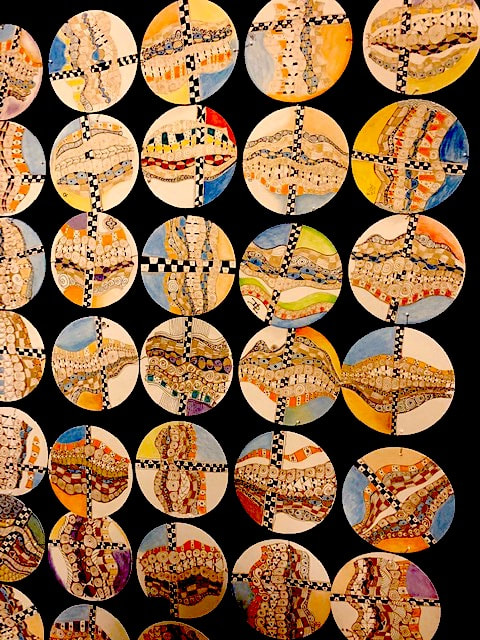 "What inspires me to paint? ...revisiting some old greats like Sargent, Homer, Whistler or local masters... thinking hard about a new approach or idea; or seeing a new painting on a friend's lounge room wall."
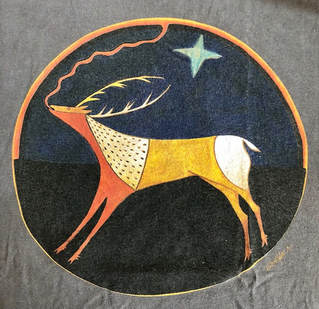
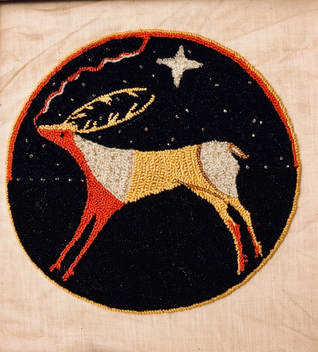
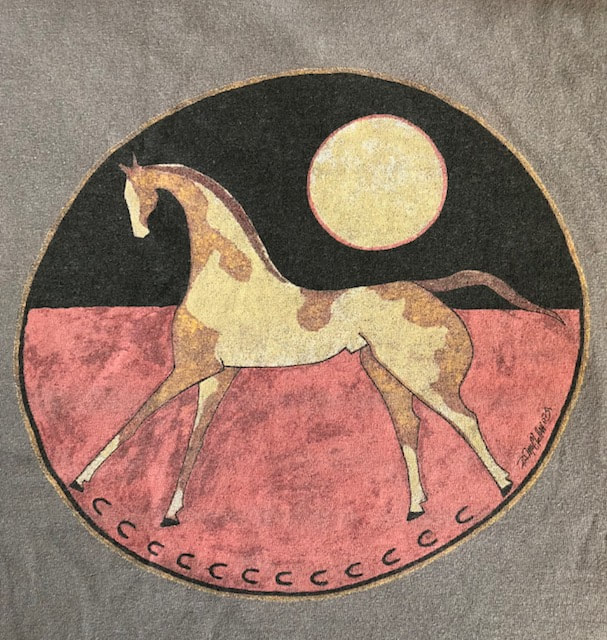
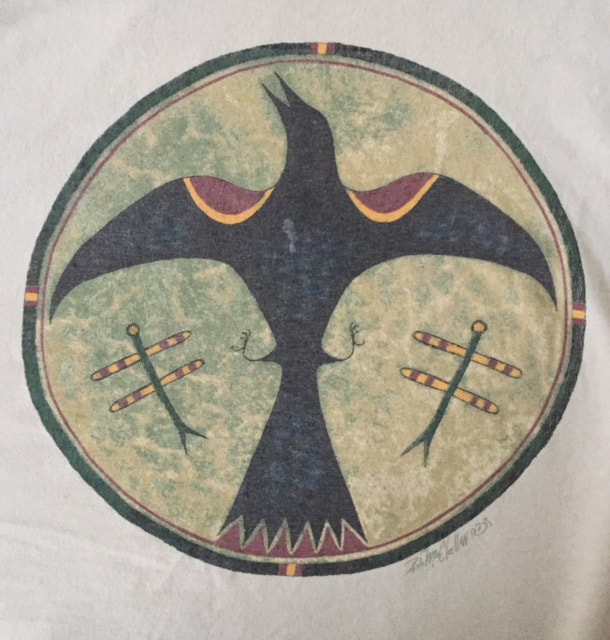
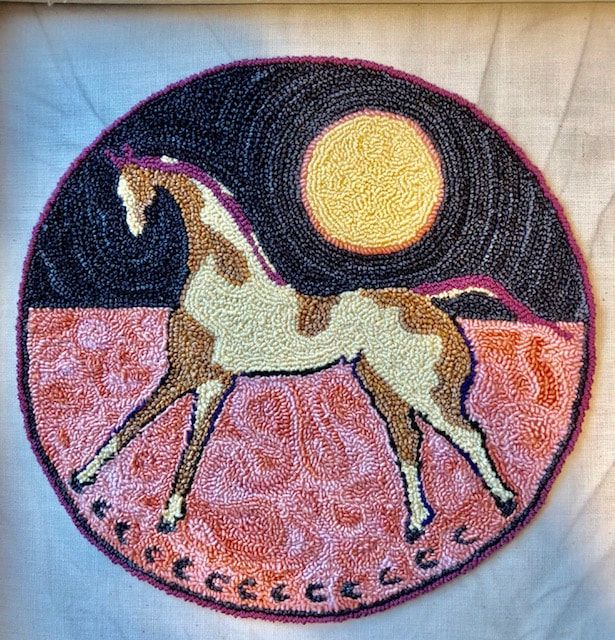
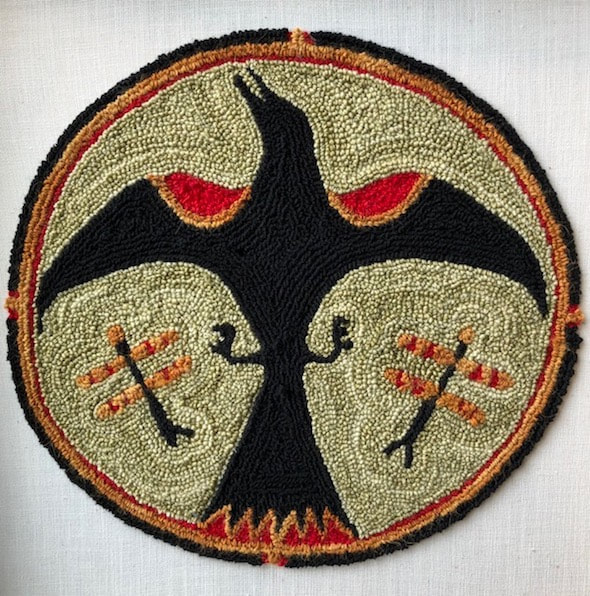
(Amanda Hyatt) ERNST HAECKEL was the inspiration for this: 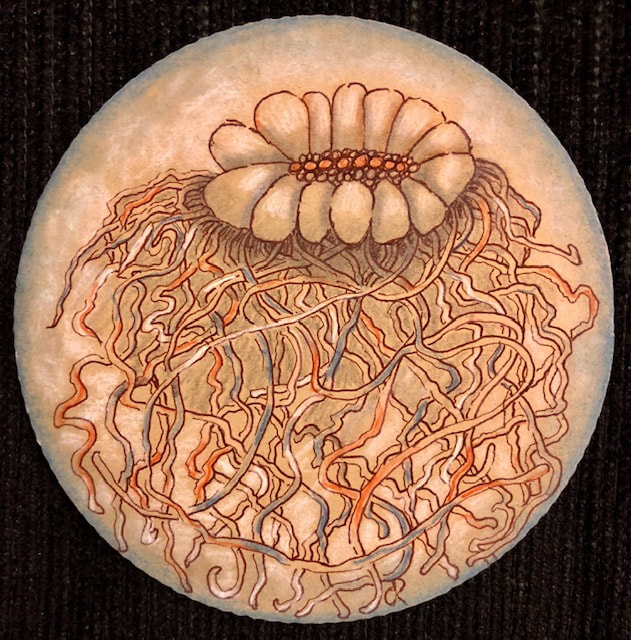 At ZenAgain this week we experimented with tangling that was inspired by other people's work. This sea creature above is inspired by the work of Ernst Haeckel, and was it ever fun to draw. Below is a mosaic of the class's work with this assignment. We were each given some General's Chalk Pencils to use--we each received different colors and were required to work with whatever colors we got. Once again, you can see that all of them were similar, and yet, each is distinctly different. This was only one small portion of a much larger table with these tiles displayed.  Maria Thomas, one of the founders of Zentangle®, has a remarkable poster with her own version of Haeckel's sea creature on a portion of it. See her poster below. I believe this is for sale but am not certain. (UPDATE: Yup, it's for sale at the Zentangle® website.)  This is only a small portion of Maria Thomas's larger work. With apologies for capturing the chandelier light reflection on the glass...no matter how I tried, I couldn't avoid it. And finally, below, is a photo of a book about Haeckel's beautiful work (the master himself). There are many books available about him.  "All my best thoughts were stolen by the ancients." (Ralph Waldo Emerson) 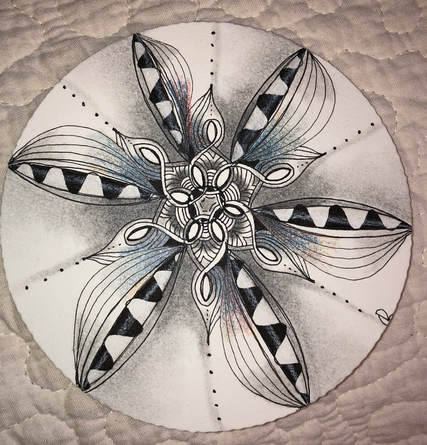 My first attempt at drawing the tangle: Ratoon. Done with a black Micron 01, graphite, Rainbow Lead Pencil, a small amount of General's White Chalk Pencil, on a white Zendala tile. Yes, this makes three blog posts in one day. It's true. Deal with it! <g> Ratoon is a new tangle from Molly Hollibaugh CZT (one of Maria Thomas's talented daughters) released earlier this week. The title of the tangle actually comes from some research that Maria was doing to prepare for ZenAgain this week. A "ratoon" is described thus: "a new shoot or sprout springing from the base of a crop plant." The theme of workshop was SEEDS--all the seeds from our art-ancestors that we use in creating art today, and all the seeds we are sowing as we do our own art and as we teach others. You can see the seeds represented in the tangle above. Just as those seeds have and will continue to sprout, so all art stands on the shoulders of all previous artists. In making our art--even if it's bad art!--we honor them. One of the many things I love about tangling is that I never know where something is going to go, how it will develop, and the highly calming effect of the process. We all get the same instructions, and yet all our pieces, while obviously related, are so delightfully different. I will put a partial mosaic of this tangle as an example of that below (partial because there were so many of us that I couldn't get the entire view).  A partial mosaic of Ratoon tangles done for the first time at the workshop.  A closer view of a few of the tiles. Bear in mind that we all had the same instructions...and look at the different interpretations.  Mosaic of tiles from new students in yesterday's class. To "round out" the mosaic, I included 2 of my own tiles--the one in the upper left and the one in the lower right. Everyone else's tile were from brand-new students. Micron 01 and graphite on 3.5" tiles (Fabriano Tiepolo printmaking paper). Yesterday morning I taught a beginner class in the Zentangle® method. What a fun group--these were all rug hookers and they were really enthusiastic since they area already so creative in their textile designs. We had a great time. I used the inexpensive portable projector for the first time, and it was "good enough" to get the job done, much to my relief. While I wish it were brighter, it was clear enough that everyone could see what I was doing. In order to create a full mosaic, I included 2 of my own tiles. On the far right of the bottom row is the tile I did during the workshop yesterday. My other tile was from a previous beginner workshop that I taught. I included these to avoid gaps in the class mosaic because we didn't have an even number of students, but I think if you look at each of the other tiles you will see what a great job the students did. Hopefully, I have created a few more enthusiastic tanglers. We finished up with some very plain linework on a Bijou tile (2"x2"): 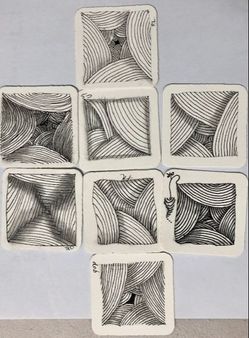 Wonderful individual interpretations with the linework! Below is my version of a tangle called Pais, which is the Day 6 tangle in the Inktober2018 challenge. I'm curious as to why I seem to be keeping up with this challenge when I rarely can with others. Maybe because I'll be teaching a class soon and want to practice as much as I can, or maybe just because these tangles are "monotangles" (only one tangle requested per day, although there's no rule saying you cannot use as many as you wish). At any rate, I'm having fun. 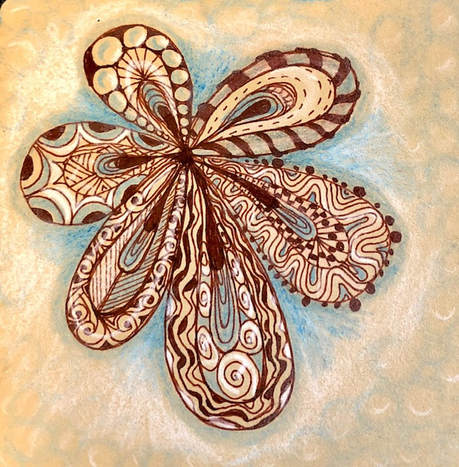 Pais (the tangle name) used as a string with many other tangles inside--some Wud, Crescent Moon, Tipple, Striping, a hint of Diva Dance, Meer, and others. Done on a tan Zentangle® tile with a brown Micron 01, blue and white colored pencil, some chalk pencil. I had fun with the background on this one also. Yesterday was an odd day. It's been a tough week politically (to say the least) and then I had a few additional major concerns about friends. I just couldn't settle myself, no matter what I tried. Finally I dragged myself out of the house and went to see this wonderful art exhibit by Jen Luck Hale, below. I had seen the publicity and knew that colors would help me cheer up. And they did. If you are anywhere near Western MA in the next month or so, don't miss this one. It's not just "snowflake-y" cut paper, it's cut paper in great colors with nature as the theme. Plants, birds, fish, insects...it's all there. And oh, the colors! What a talented artist she is. From what I have read, she does NOT draw on the paper, but just "cuts by eyeing it." Wow. Read about her process HERE. Details and a couple of photos below. Don't you feel better just looking at those colors? 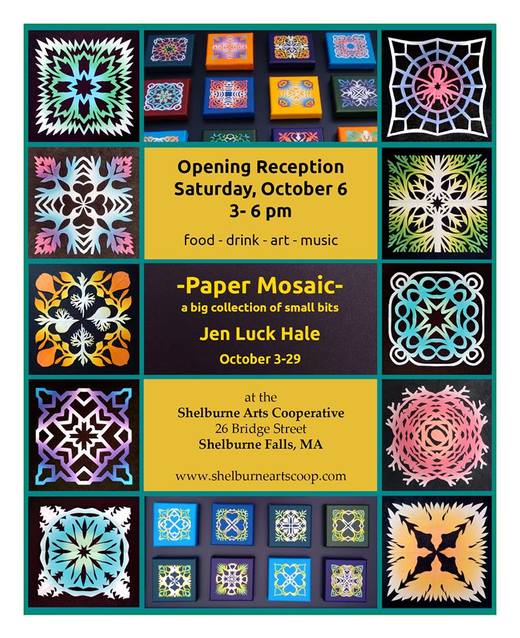 This (below) is only a small portion of what is on display. 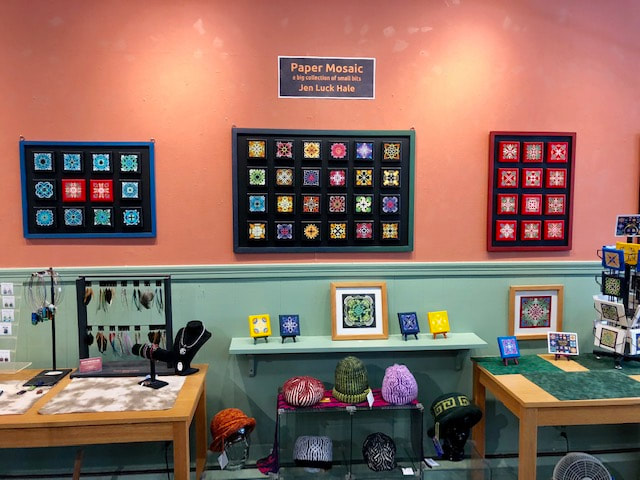 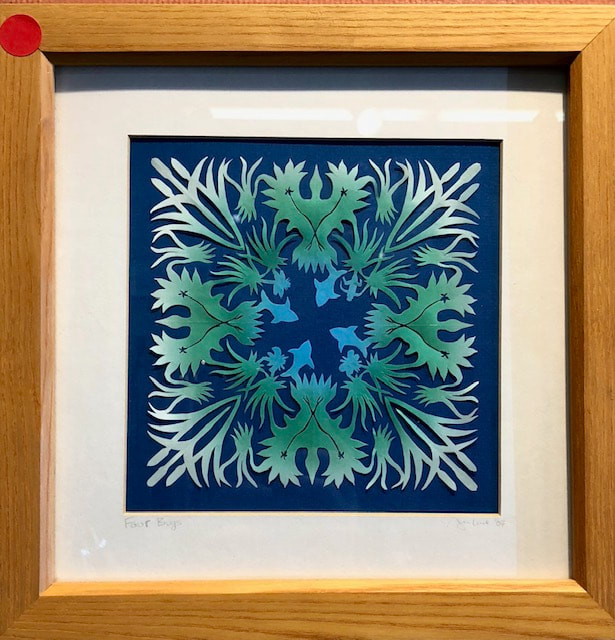 © 2018 to Jen Luck Hale, all rights reserved. I fell in love with and bought this one, titled "Four Bugs." I can only find three but perhaps what looks like a lizard to me is actually a bug? I love it. I've left it there for the duration of the show and then will claim it. 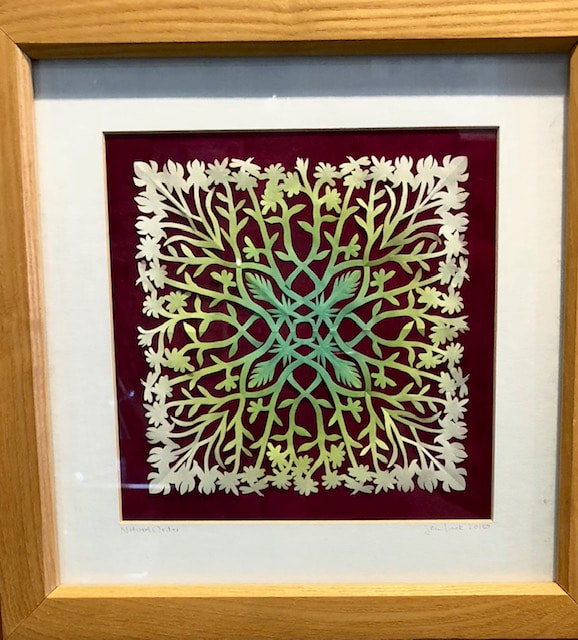 © 2018 to Jen Luck Hale, all rights reserved. An unfortunately wonky photo but I also thought this one was gorgeous. I love her work. This is titled, "Natural Order." I wish I could have bought both! 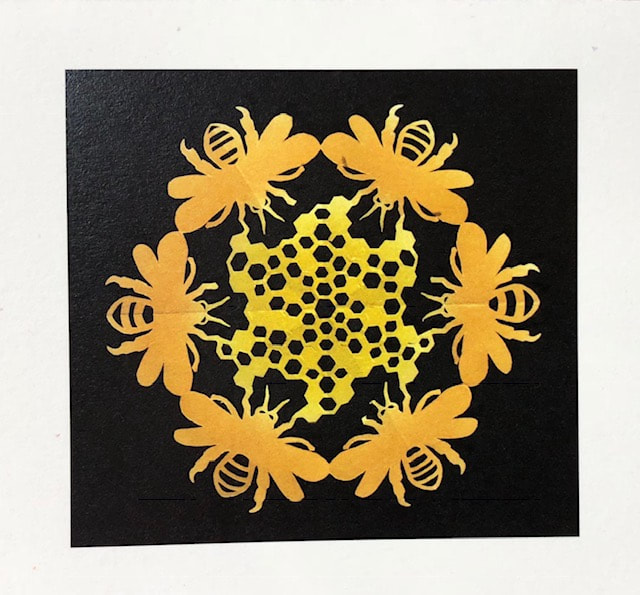 © 2018 to Jen Luck Hale, all rights reserved. This one's called "Night Shift." It may just be my favorite. I had to content myself with buying it as a card, though, as I didn't see the actual piece on display. Darn... Once upon a time, in a land far, far away, I bought three t-shirts, each with a different design I absolutely adored. Each one was like a mandala to me. [Ok, so it was actually only 2 1/2 hours' drive from here and only about 20 years ago. But I do love these t-shirts.] Slowly but surely they are all starting to wear out. I got the idea to use the designs for a series of 3 punchneedle embroidery pieces (see the other two designs below), and have just completed the last of the trio. The designer, Rob McLellan, gave his t-shirt designs titles, and the title of this one is "Elksong." Many thanks to the folks at University Silkscreen for giving me permission to interpret these designs in my needlework. I'm really happy to finally be able to share what I've been working on all summer.
Below are the two previous works in my series, Midnight Pony and Redwing Blackbird. Rob McClellan was an artist who lived in Ohio in the late 20th century. He died in a car accident around 2005. A fascinating man, he was adopted by the Cheyenne Tribe and much of his art reflects that.
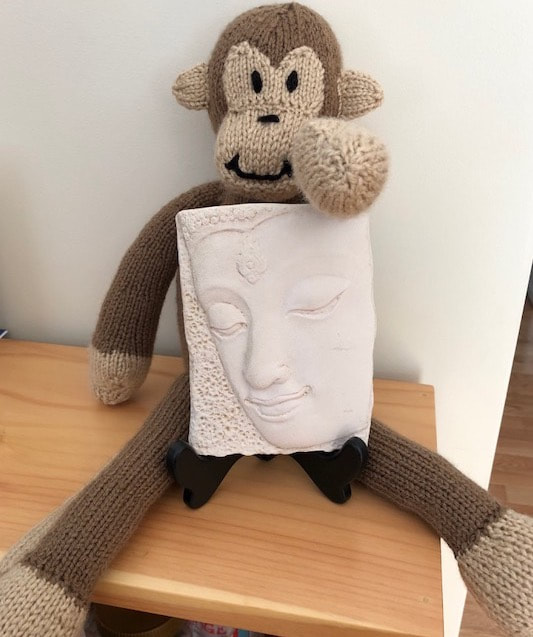 Hand-knit toy by my next-door neighbor, Val. One of the many and varied toys she knits. They go like hotcakes...(I added the Buddha, of course) I admit I am somewhat mixing my religions and cultures here. Hanuman is the Hindu monkey-god known for his strength and devotion (and much loved by Ram Dass, the longtime meditation teacher, author, and speaker). Hanuman is normally depicted with a human body, but I hope we can cut him a little slack here. And then of course, there's Buddha. Actually, Hanuman is also found in some Buddhist teachings as well, but not as commonly as in Hinduism. I put Buddha in Hanuman's lap because I thought this "alternative version of Hanuman" might need a dose of equanimity before he got crammed into a box and mailed off to a friend as a gift to her 8 month old son. So, Hindu and Buddhist figures are playing together in this photo. [NOTE: Hanuman is now on his way to his next adventure - he's in the mail - and I've no doubt he is fully up to it.] This is another wonderful toy made by my next-door neighbor. She has a large assortment of hand-knitted toys--penguins, ducks, dogs, kitties, dinosaurs, you name it. All beautifully made. And then there is all her other lovely knitting, but since I don't have pictures, I won't go into that. But you can imagine how kids react to these toys! It's pandemonium when she sells them at fairs. She is so clever. 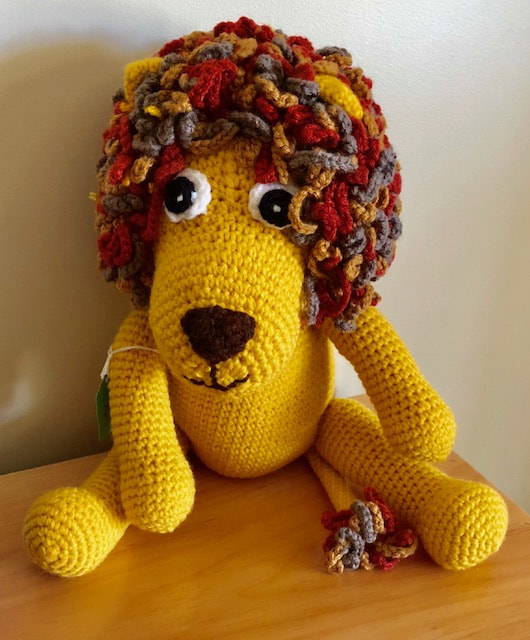 This CRAZY-CUTE lion toy was made by my next-door neighbor. It's an honor to be living next to someone who can produce something as wonderful as this. A closer view: 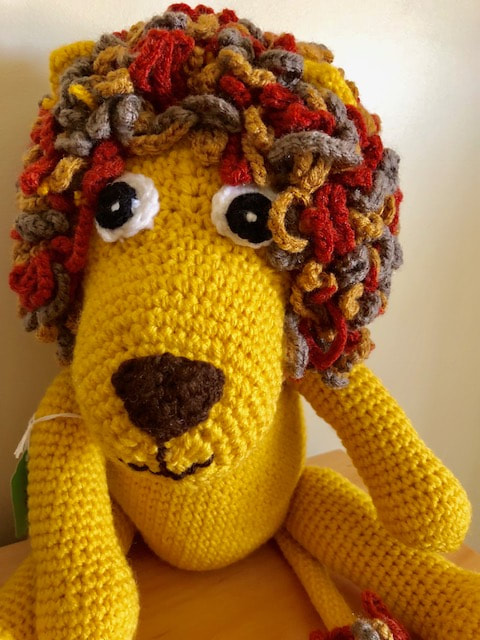 OMG, that mane!!! Is that not just fabulous and hilarious. I love him. I bought him for a friend's baby boy, but honestly, how can I give him up? My covetous evil twin has taken over and I want to keep him.
This was so adorable that I thought it was worth two posts today. One of the very kind Quabbin Rughookers invited us all to her lake house in Spencer on Sunday. What a house! And it has a wonderful history (too long to go into here but I delighted in hearing it). Anyway, we sat in a lovely room overlooking a gorgeous lake in beautiful weather--every moment was enjoyable. It was such a fun day. Here are the rugs people were working on (photos by permission, of course). With thanks to Diana for hosting us.  Black Micron 01 and Prismacolor watercolor and regular colored pencils, Gellyroll in white, size 08, white General's Chalk Pencil. I spent the day today in Elaine Huffman's studio, learning to make these button-like zendalas from the wonderful Chris Titus. (Yes, Chris is the originator of the Zondom, the clear plastic sleeve to protect Zentangle® tiles. I use these all the time.) We spent most of the day making the backgrounds; I had to leave a tad early so I only got to tangle this one, but others were able to get a second one done. Full disclosure: Chris herself had made the backgrounds for all of these to make it easier for us, and we each did the same tangles on them. Here is the group mosaic, with one wonderful exception:  They matched so well with Elaine's pink flamingo tablecloth, don't you think?
Definitely a hugely fun day. Thanks to Chris and Elaine. I don't yet have a new project to dye wool for, although I'll be starting one soon. But I do have a dear friend who was visiting and interested in learning to dye yarn, so I thought it would be a good time to try out Lucy Richard's Wooly Mason Jar Dye technique. And it was--we had a lot of fun last Saturday, even though we went "off-road" and did our own thing rather than following Lucy's directions. Why? Because I'd had no time to read Lucy's instructions and so hadn't done any of the prep work. She has a very specific and relatively foolproof system that I'm interested in learning. Although we didn't follow her method, we still got into the dyepot and had a lot of fun. Here are some photos from the day. Oh, and where does the title of today's post come from? Read on; the story is after the photos. Pretty funny.  This is my buddy mixing up her dye solution. 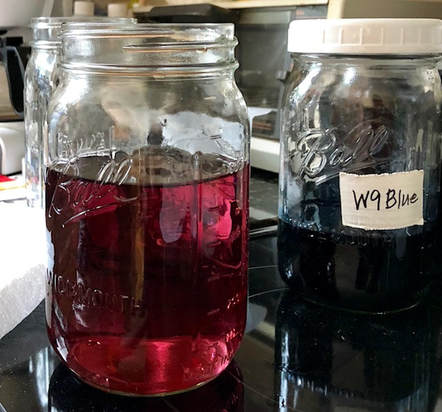 The Lucy Richard method involves making dye solutions in jars. One of the 3 "starter" primary colors is Warm Blue, and that's what you see here on the right. We didn't have time to mix up all the initial solutions for this very exact method, so we ad-libbed and tried our own thing, which you see in the pink jar. 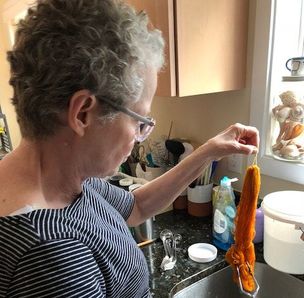 Having just rinsed the first skein of yellow that we tried, my friend is loving the color she achieved. A wonderful pumpkin hue. 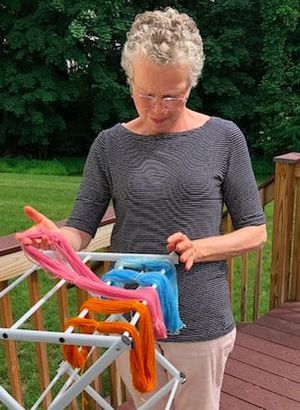 On my back porch, ogling her drying yarns. 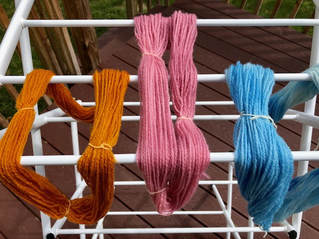 Still drying... 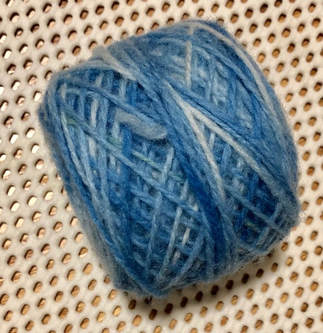 After it dried, we took the variegated blue skein and wound it into a ball. This is going to be lovely when woven. (She is a weaver.) THE STORY OF THIS YARN AND THE TITLE OF TODAY'S POST: We had gone to WEBS on Friday. While there, my friend decided to pick up some white wool with which to practice dyeing. After walking around in the warehouse, she spotted a poor...unfortunate...very small cone of white wool yarn sitting all by its lonesome on a shelf with a few other assorted fibers. This cone of yarn was. very messy and disorganized, to say the least. The strands of yarn in the upper part seemed to be trying to jump off the top of the cone and run away. It looked like a fiber in distress. The tag said 100% wool and the price was only $2.50. Next we spotted a sign on the shelf that said (I'm not making this up): "Good yarn with a sad story." ???!! Well, what could we do? She HAD to buy it and take it home. So she did. We carefully took it off the cone and wound it into 3 skeins when we got home. There was only about 40 ounces total on the cone, but it was enough to play with in the dyepot. And so, our "good yarn with a sad story" actually got to have a happy ending. It now looks far more glamorous, and my friend will incorporate it into one of her beautiful woven wall hangings. A very happy ending indeed. Oh, and did I mention that she is now addicted to dyeing yarn? Yup. She'll be fabulous at it. Wow, stunningly beautiful weather this last little while--sunny, warm (but not hot), and no humidity! Today was lovely. I drove to a friend's house for a rug hooking event, and we were able to work outside in her gorgeous backyard. Perfect weather and no bugs! We hooked on her patio while viewing her colorful garden and listening to the din from hungry baby birds and their parents in a birdhouse not more than 4 feet over our heads. The birdy-parents came and went ceaselessly, trying to stuff food into the mouths of the kids. And were those kids noisy and demanding! Parenthood is never easy no matter who the parents are... Here are some of the rugs I saw (of course I got permission for these pictures--thank you all!): 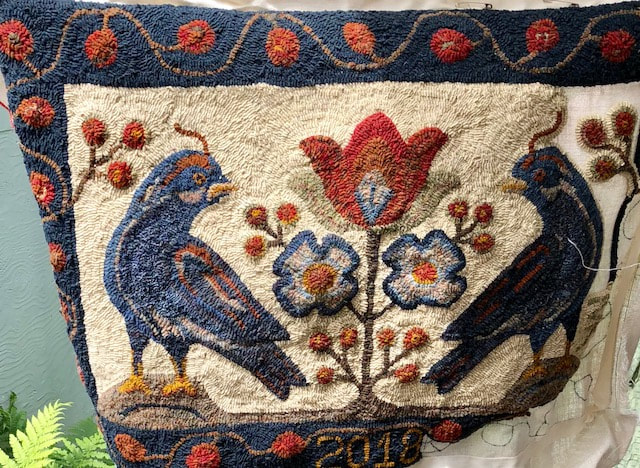 Kathy is almost finished with this beautiful rug--I believe she said it's an Emma Lou Lais pattern. Or was it Edyth McNeil? 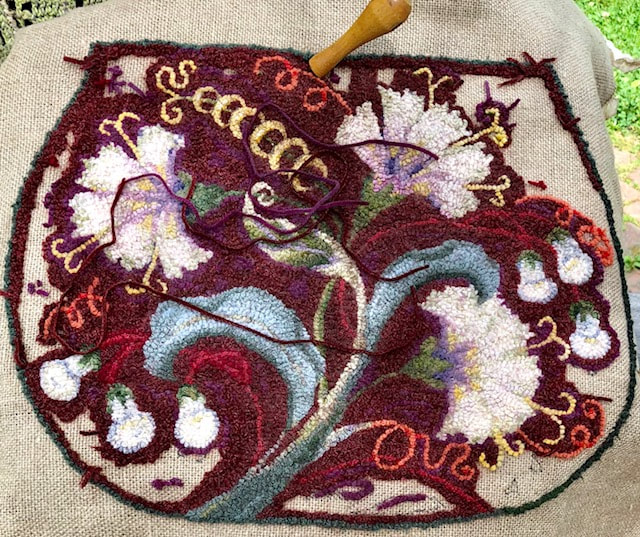 This is a beautiful old McGown pattern being hooked by Marge. Rumor has it that she hasn't been hooking that long, but you'd never know it by the looks of this lovely piece.  Lynda is making excellent progress on her very large rug of her own design, dedicated to/portraying the Peace Pagoda, with its prayer flags flying everywhere. This is going to be a stunner. I love what she has done with the whites on the Pagoda. 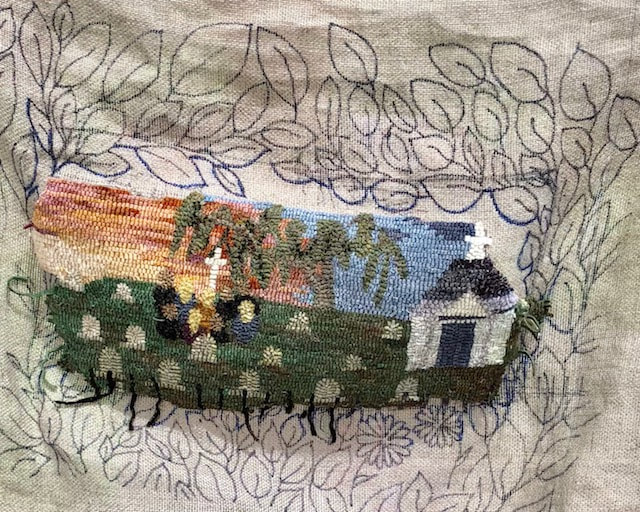 Joanne is working on her own design of a cemetery at sunset. The border will create the illusion of looking through woods into the scene. There is something so peaceful about this. 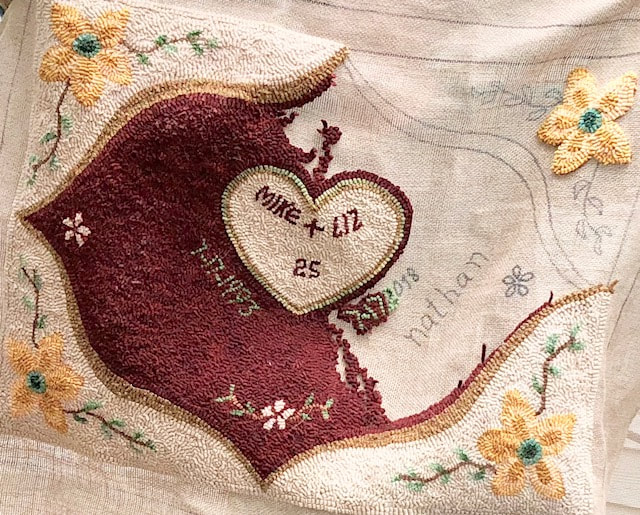 Diana is working on this rug to commemorate a 25th anniversary of a marriage (of one of her kids, perhaps?). Such an elegant design and I'm loving the colors. I remember her saying she'll be doing the same pattern (one of her originals, I believe) in different colors for a sibling as well. And now for something completely different... Diana had just gotten back from babysitting for four days while family members took a short vacation to Aruba (something they had won! What luck!). They brought back this amazing object for her. Even more amazing is the description of the artistic process that was used to create it--it may look painted, but it isn't. See the photograph right underneath it describing how it was done. I have never heard of this art before, but I love this little critter. Isn't he (or she) a beauty? 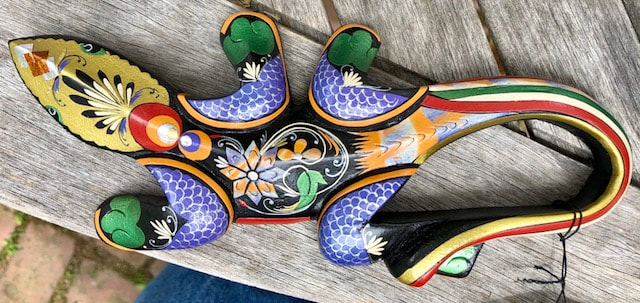 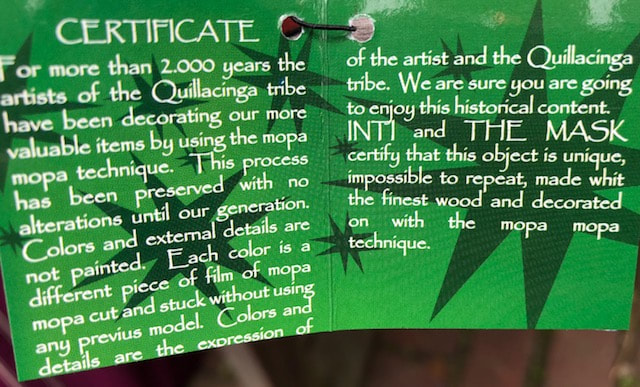 Truly impressive. I will have to google "mopa mopa," which I've never heard of before now.
I capped off the day by 1) treating myself to a wonderful documentary on David Hockney's 2012 and 2016 exhibitions of landscapes and portraits. More visual delight! And then came home and finished a tense and good WWII-themed novel. All in all, a delightful summer day. I am feeling fortunate indeed. This is a quick post that falls squarely in my "Other People's Work" category. Remember my blog post from 5/23/18 with the phenomenal mosaic that resulted when the entire class put its tiles together? Review the picture here. It's at the bottom of that post. Well, my internet buddy Susie Ng from Thailand saw that photo and "couldn't resist" giving it a try herself. (Thank heavens.) So she recreated the original tile--putting her own unique spin on it--and then used Photoshop to create a mosaic, using her single tile as its basis. Check out this result. Fantastic! I'm so thrilled that she couldn't resist. We all benefit.  Copyright 2018 to Susie Ng of Fleeting Time Zentangle, all rights reserved. Tangles used: Pokeroot, Crescent Moon. And--hold onto your hats--here is the mosaic she created from the above tile, using Photoshop. I absolutely love this!  Copyright 2018 to Susie Ng of Fleeting Time Zentangle, all rights reserved. Susie is one of the most original and creative tanglers I've ever run across. I read her blog avidly (find it here) and always learn something. I frequently go back and study her tangles to see how she has handled things I would like to learn. We've struck up a bit of a penpal relationship too, and she's just the nicest person. Don't miss her frequent postings in support of animals and animal rescues, often found at the very end of her blog posts. They are alternately funny and incredibly compelling. Enjoy. Thanks to Susie for allowing me to post this. "Resistance is futile." Hey! Not bad! In fact, really great work by the 6 new students who learned Zentangle® from me this afternoon. 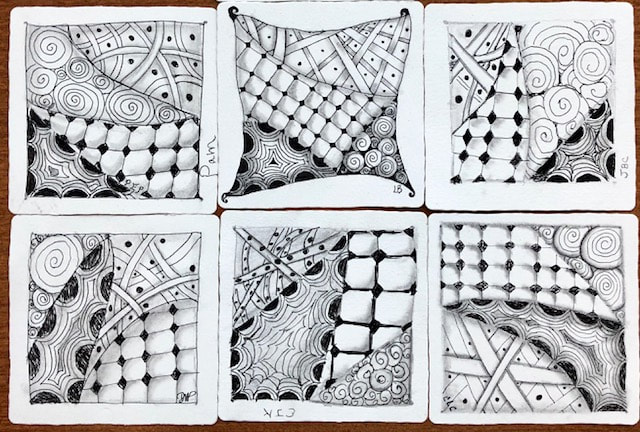 I'm guessing students ranged in age from 55+ to well into their 80s. All of them did just great. In preparation for the class, I did these two tiles last night in case I had time to teach all this today--but of course we only got through one tile, the first one below. The second tile below I did "just in case," but I kept it in my back pocket. Below those is a photo of the lovely classroom. It was my first time using a document camera and projector, and I'm pleased to say that went really well and made it easier to teach.
And here's a look at our lovely classroom. Thanks to the Community Center. 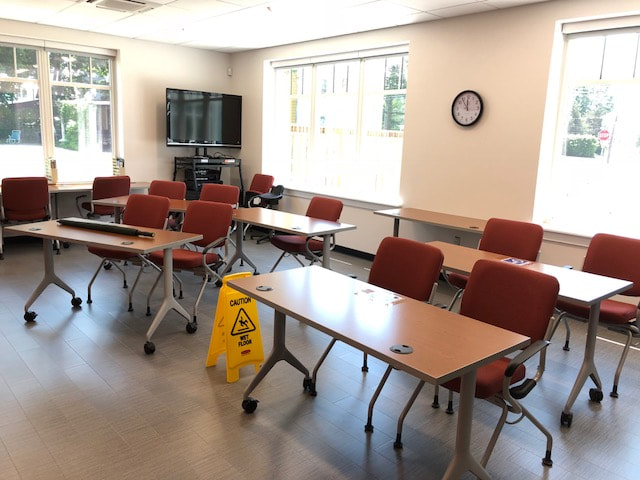 Just back from a workshop led by Martha Huggins and Molly Hollibaugh of the Zentangle® family. (If you are unfamiliar with Zentangle, click on that link and prepare to enjoy their well-done website loaded with art eye candy.) I was very fortunate to attend with a good friend, and we got to spend the whole weekend doing art. Such luxury! I have many more photos to post but to start, here are examples of two tiles we did this morning. After both my own tiles, I'll post the mosaic from the group. Not familiar with this terminology? Not to worry, here's what I mean: "tile" = a small piece of paper that we draw on, and "mosaic" = the collection created when a class puts all their tiles together. The fun of the mosaic is that everyone has heard the same instructions, but look at the assembled collections of tiles below (mosaic) to see how individual each tile is. And yet they go together wonderfully. Here are my own two tiles, and the class mosaics follow.
 Most of the class's mosaic of the tiles done with Bales. Look for the subtle and the not-so-subtle differences... So much fun! 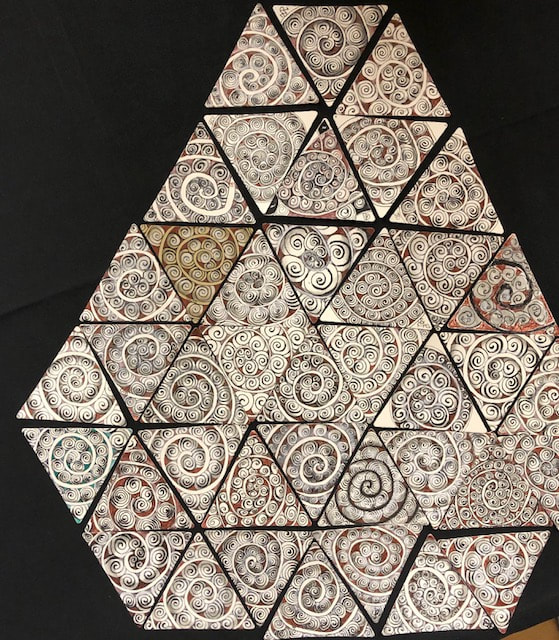 The mosaic of most of the tiles based on Printemps. Some people used Renaissance tiles for this one; most people used white. Isn't this an amazing mosaic? Not everyone had time to contribute a tile but I think this was the majority of the class. We all heard the same instructions; note all the differences and yet they all work when put together. |
ABOUT ME I'm a textile artist (traditional rug hooking, punch needle rug hooking, and other textile arts), a long-time meditator, a certified meditation teacher and coach, and focused on learning about the interplay of art, creativity, and mindfulness every day. 
Certified, 2021
Certified Unified Mindfulness Coach

Certified Zentangle® Teacher, 2013
Certified by AmyOxford.com at The Oxford Rug Hooking School, 2016

Categories
All
Archives
July 2024
SITES TO WATCH:
Insight Meditation Society Oxford Rug Hooking School Zentangle: The Official Site Green Mountain Rug Hooking Massachusetts Tarot Society 
|
 RSS Feed