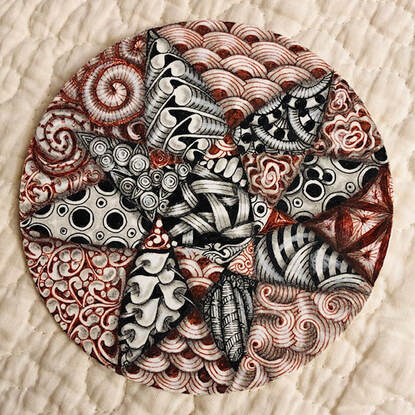
 Brown and black Micron 01s, graphite, white chalk pencil. It's been a hard week. I'll leave it at that.
Two years ago I started hearing about this show, which is only run every other year. 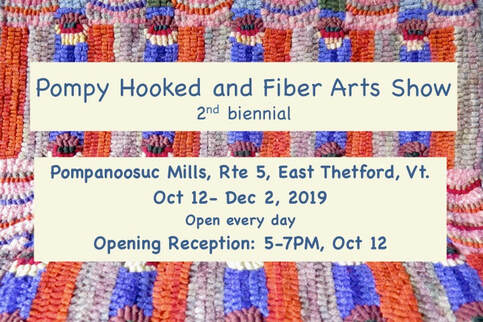 Because I was sick, I missed the 2017 show and was determined to get to this one. I made it to Vermont today and am glad I did. This show is held at the Pompanoosuc Mills home base in Vermont, a gigantic workshop building where their signature furniture is made and the location of their flagship showroom. Why a rug & fiber show there? Because Ed O'Keeffe, the Showroom and Web Manager, is also a rug hooking artist. Ed teamed up with Jennifer Davey, another rug hooking artist and a past president of the Green Mountain Rug Hooking Guild (GMRHG), to mount this show on an "off-year" from the big show that is put on biannually by GMRHG. Because the Pompy showroom is simply immense, there is a lot of wall space. It's the perfect place to hang rugs! And hang they did--check out these wonderful pieces below. Note that I did not get pictures of all the rugs, only about half of the ones on display. 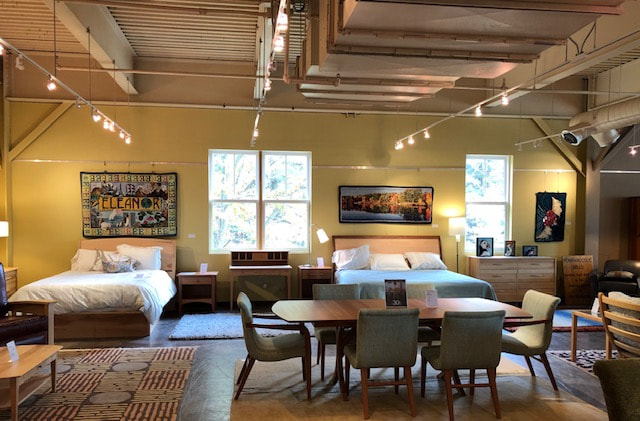 This is only a small portion of the floor space at the immense showroom. You can see 3 rugs hung on the walls in this space. It's spectacularly large, light and airy (two walls entirely of glass) and the perfect place to showcase not just their high-end furniture, but also hooked rugs. 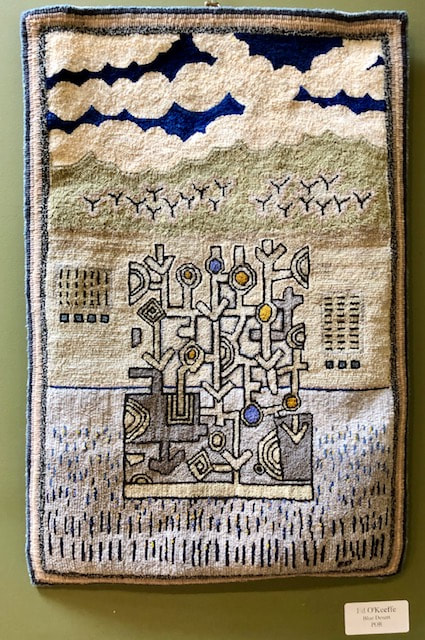 One of Ed O'Keeffe's rugs, titled Blue Desert. Ed is the manager of the Pompanoosuc Showroom, and also their Web Manager. 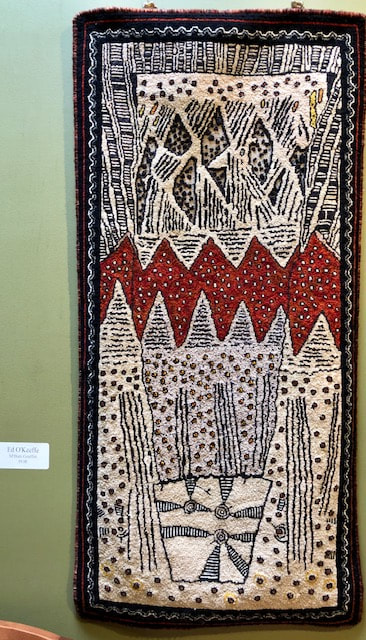 I really fell in love with this rug, another design by Ed O'Keeffe titled M'Buti Graffiti. 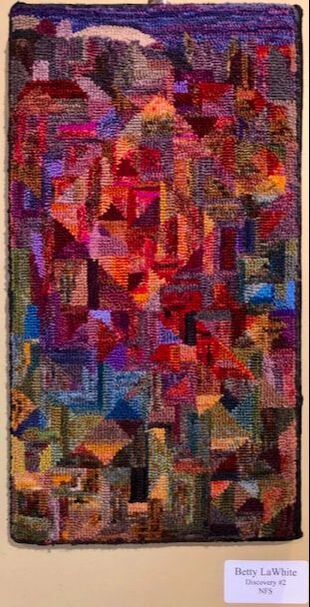 This is Betty LaWhite's rug, titled "Discovery #2." Wonderful colorist! She had two rugs in the show but I only got a picture of this one. 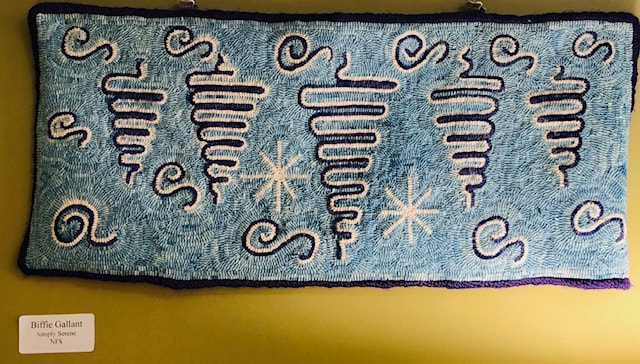 "Simply Serene," a lovely rug by Biffie Gallant of Green Mountain Rug Hooking Guild. I should add here that all these rugs came from the talented members of the Green Mountain Rug Hooking Guild. I'm thinking that Jennifer and Ed selected them from the Guild's bi-annual show and curated them for this display. 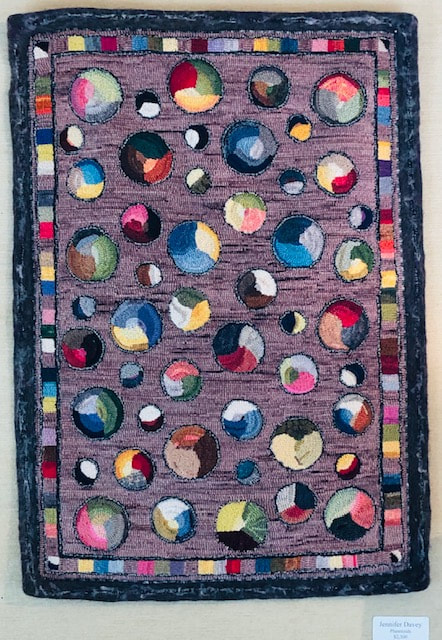 "Planetoids" by Jennifer Davey. 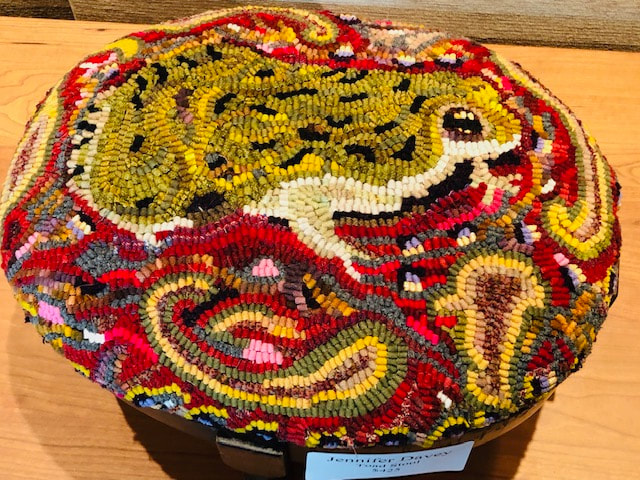 The fabulous "Toad Stool" by Jennifer Davey. An absolutely adorable footstool. 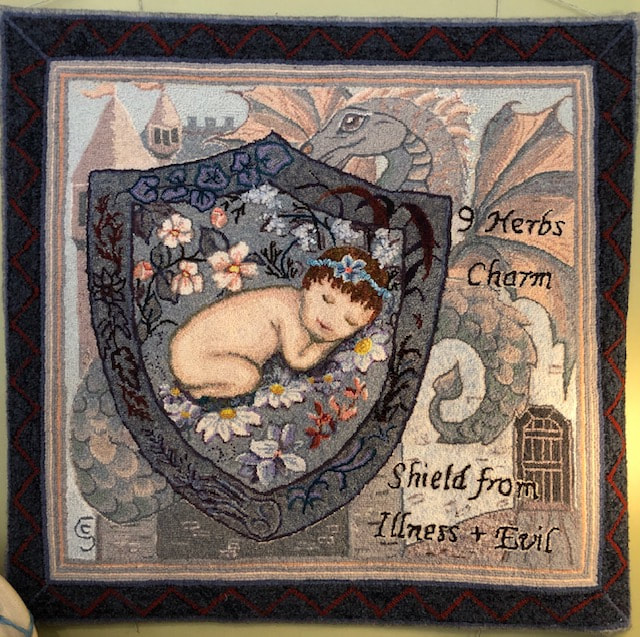 "Shield from Illness and Evil" by Grace Collette. Charming indeed. This one made me smile. 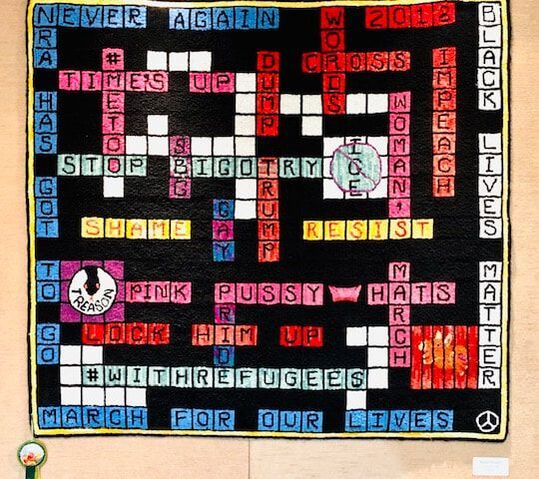 "Cross Words" by Susan Gault. The work that went into this! Ed told me that she normally hooks room-sized rugs. This was quite large, perhaps about 5' square. 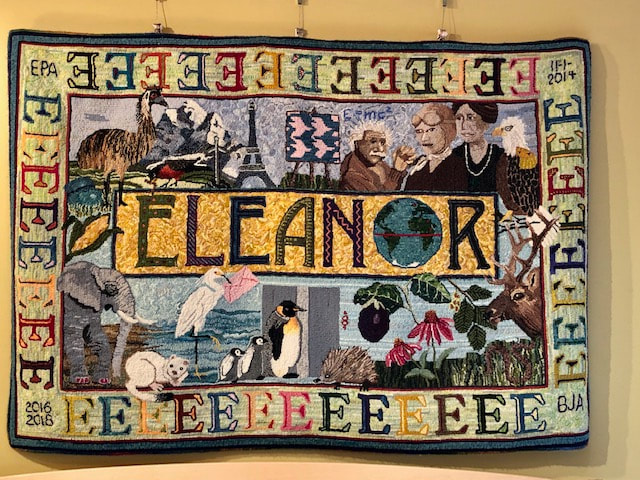 Eleanor by Barb Ackemann. Wow. Just, wow. 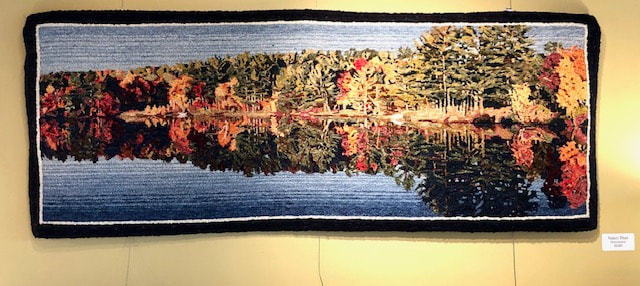 "Mirror Mirror" by Nancy Thun. This one has to be seen to be believed. And even then it's unbelievable. Gorgeous. 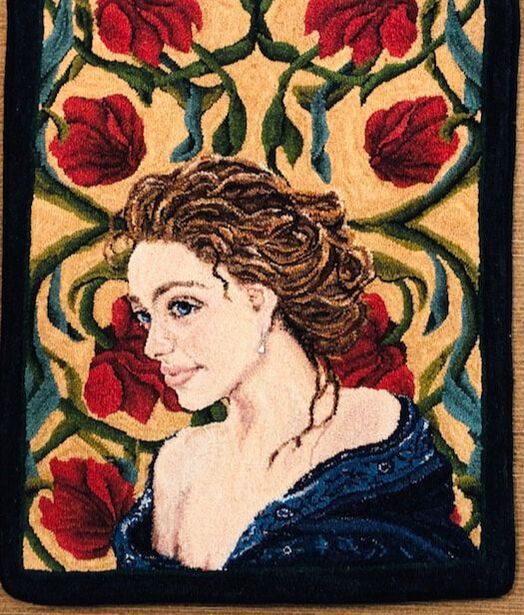 "The Muse," by Dana Psoinas, who never fails to astound me. Another of Dana's astounding rugs, Red Riding Hood, was also on display here, but I have already dedicated an entire previous blog post to Dana. Her Red Riding Hood rug is so spectacular that an Australian rug maker did a blog post on it that's in-depth and quite good. Don't miss it! You can find it HERE. And to see more of Dana's work, check my previous post about her HERE.
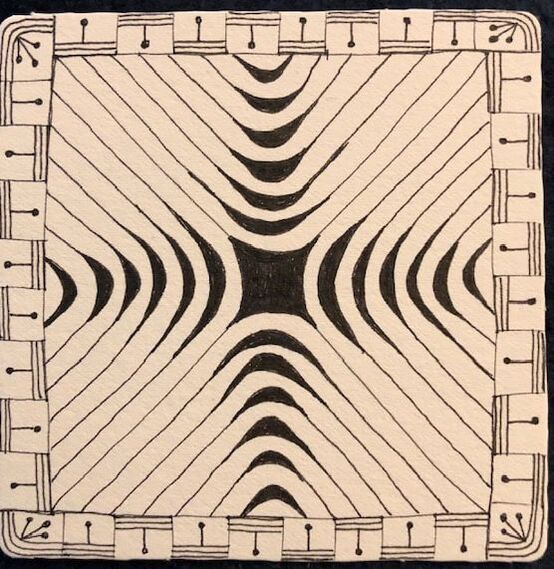
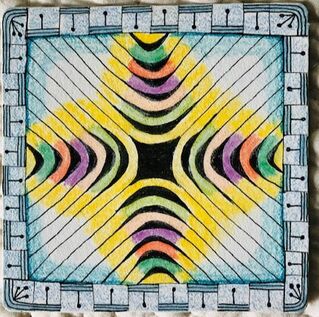
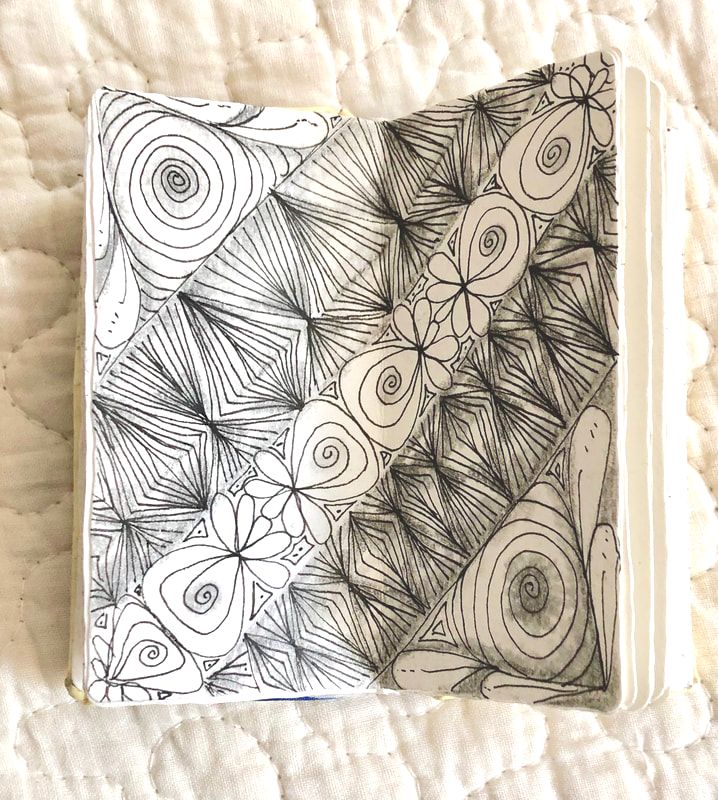
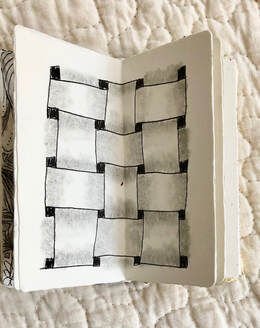
Despite these many photos, there were at least as many, if not more, rugs and wall hangings on display (and of course, the beautiful furniture everywhere as well). If you are in the area, this show is well worth a visit. Details on how to get there and the duration of the show are on the postcard at the top of this post. Enjoy!  Tangles are Jalousie (around the border) and Zonked (in the center). MIcron 01 black on white paper. 3.5" square. I did the above tile late last night just before sleep. It's two of the Inktober 2019 days together, days 4 and 5. I have quite a bit of catching up to do. But of course this isn't a race. After yesterday's spectacular foliage display, I decided that I wanted to shade the tile above in all the colors I had seen in the leaves on my trip. And there were a LOT of colors. I pulled out my General's Pastel Chalk pencils and set to work, with this result below. The blue represents the intense blue sky behind the leaves.  And here they are side by side:
“Autumn...the year's last, loveliest smile." ― John Howard Bryant “I'm so glad I live in a world where there are Octobers.” ― L. M. Montgomery, Anne of Green Gables 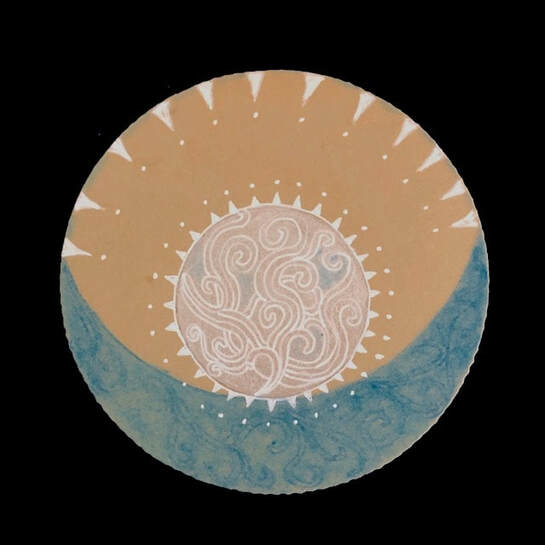 Painted this full moon with Silver FineTec paint; the blue crescent is General's Chalk Pencil. I also used White Chalk Pencil and White Gellyroll on this Renaissance (= tan) Zendala. The primary tangle I used here was Hollis. Next Sunday afternoon is the full moon, in the corner of the universe where I live. It's supposed to be unusually large. And orange. I chose to ignore the orange for this Zendala tile, which I did for Hanny Nura's monthly celebratory Full Moon Mosaic. If you google "Full Moon Mosaic" on Facebook or Instagram you'll see some amazing entries.  Meanwhile, I've been asked to do a Zentangle® demo at a local organization and in thinking about which tangle to ask participants to do, I'm going to use this one, Fassett by Lynne Meade. Which means I need to practice it myself, having only ever done it once or twice--and of course I'm falling in love with it. This was my first try at it, done on a Renaissance Bijou tile (2" square).
 I ran my original photo thru an iPhone app and got this. A lazy way of adding color. See details on the original photo below. 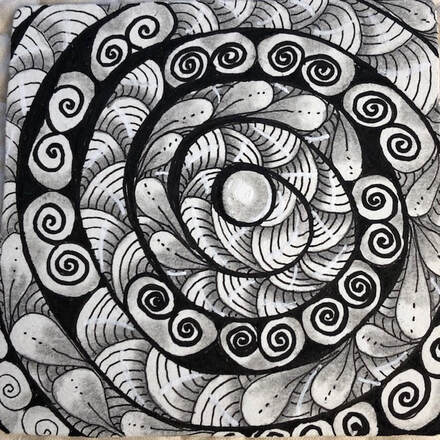 For Day One of the Inktober Project (the tangle version), the prompt was Printemps. Tangles are: Printemps, Shattuck, and Flux. Micron 01 and 1, graphite, white gellyroll. Ahhh, the start of October and cooler weather. I hope. It's also the start of the annual drawing event, Inktober. There are many versions of this, and a few of them focus on tangling. I used today's prompt (the tangle Printemps) as the string for this tangle, then put more Printemps inside it, along with Flux and Shattuck. I like the result but I also ran in thru my iPhone app and the color version was very fun.
My form of church, that is. I left very early today to meet a friend and fellow textile artist on a rural road 45 minutes from my home. Each with rugs in tow. Our goal was to drape the rugs we brought over the stone wall that looks over a meadow and then down, down, down into a huge reservoir (part of which is just barely visible over the tops of the trees and under the surrounding hills) and get a decent photo. I ran the resulting picture thru an iPhone app and got this. I'm pleased. It's a mix of a few of my rugs and a few of her rugs. 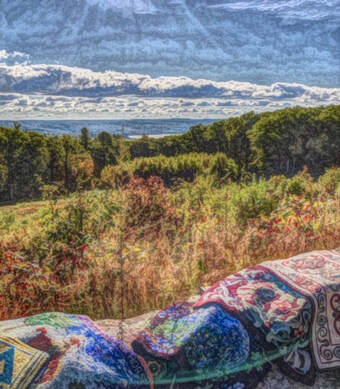 This picture describes my spiritual life--the natural world plus a meditative form of craft such as traditional rug hooking. The light, the earth, the stones, the colors, the sun, the clouds, the wind, the water, the trees, the hills. I can't think of a better place to be on a Sunday morning in the autumn. “The sun shines not on us but in us.” ― John Muir 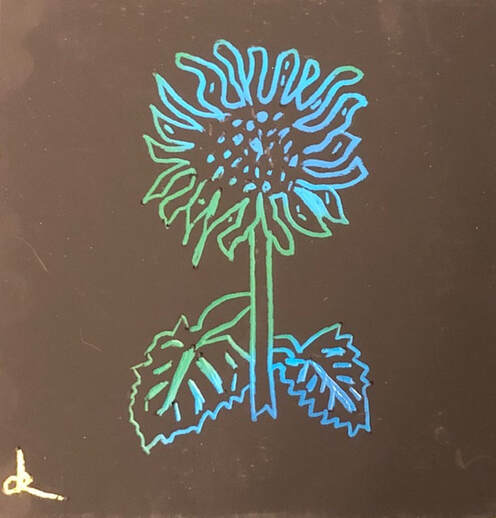 Drawn on an Art Scratch tile with a wooden stylus. (The idea here is you scratch off the black coating and uncover the shiny colors beneath it). The image is ©Susan Riecken 1979. This was my interpretation. See below. This image adorned the cover of my old 1979 calendar, one of the many I bought annually from rubber stamp artist Susan Riecken, who seems to have disappeared; I can't find any online presence for her and the last calendar I was able to get from her was in the early 1990s. After that she closed her Cambridge studio and I couldn't find a trace of her. Here is the actual cover of that calendar: 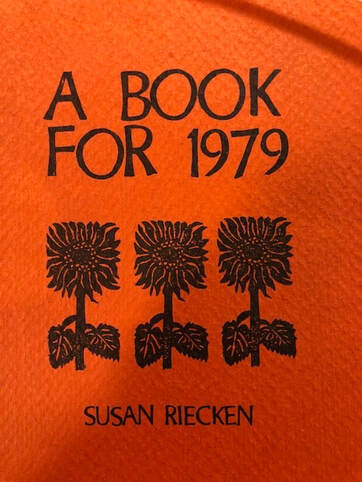 I completely adored her work. Each calendar was a labor of love. She carved the stamps from erasers and in the early years I *think* she hand-stamped each calendar, though I'm not sure. Pretty soon she had the hand-stamped pages reproduced so that she could produce the calendars in bulk, but that never interfered with the delicious colors or the funky marvelous designs. She was/is an art idol of mine. Wishing her well wherever she is, and hoping she's well and happy and making more art, even if I cannot find her.
About my interpretation/copy of her sunflowers: I knew when I ran across this calendar the other day that I wanted to try making a "stamp-like" design by scratching away on an Art Scratch tile. Using a wooden stylus would, I thought give the same chunky effect as a carved stamp. I think I was right. 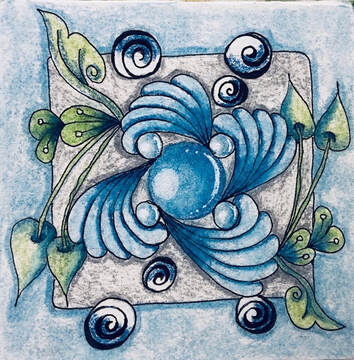 Tangles: Fayz, Pokeleaf, Weighted Printemps, ICanToo. General's Chalk Pencils, Micron 01 in black, a bit of White Gellyroll #10. Tangles: Fayz, Pokeleaf, Weighted Printemps, ICanToo. General's Chalk Pencils, Micron 01 in black, a bit of White Gellyroll #10. Woke up early today and used the extra time to do this tangle. I had watched a Romi Marks (Tangled Yogi) video and used most but not all of her tangles for this. She uses colored pencils, as have I when I've used her paper tiles, made from cardstock so they are very smooth and handle colored pencils beautifully. I was using a regular Zentangle® tile today, though. That's made from printmaking paper and has a lot of tooth. So I went with General's Chalk Pencils for the color. Today all I knew when I sat down to draw was that I wanted to work on something blue, invoking the quiet calm of that color. When more than a day passes with no drawing, I get tangle-deprivation syndrome. So, waking early was a pleasure; meditation is easier for me at that time of day, and I've noticed that any drawing I do at dawn or after dusk tends to be less self-conscious than when I draw during the day. Blue color is everlastingly appointed by the deity to be a source of delight.
--John Ruskin I took another tangling class today, this one with Heidi Halpern Kay, a talented artist who has been teaching for only one year. She has no website that I can find, but she's active on Pinterest and Facebook. My hope in taking all these recent classes has been that they would inspire me to get back my creative mojo. I think it's working, although I won't know until I begin doing my own designs again.  This tile introduced me to Ecoline Markers, which I had never used before. Very interesting. I'll be doing a lot more experimenting. Tangles: Printemps, Hollibaugh, Pokeroot/Pokeleaf, Mooka. Ecoline Markers, Copic Markers, White Gellyroll, White chalk pencil, White Uniball Signo Pen, Sakura Multiliner pen. That's a lotta art supplies! The big news for me is that I've begun another hooked rug. It's not at the stage where I can show anything; everything so far is just experimental and it will be awhile until I have something to show. This is one reason I think I'm starting to get back some mojo. Hurrah! "What art offers is space--a certain breathing room for the spirit."
--John Updike A good friend who is also a CZT (Certified Zentangle Teacher) was here this week and stayed long enough for both of us to take the same online class via the TangledYogi--aka Romi Marks, a very good teacher. I'd encourage you to check out her work, including her YouTube videos. Below you will see our results. The first two are mine--think of them as Draft 1 and Final. Here is the draft:  Romi refers to this as the "Aloha Waves" piece. The design is hers, but drawn by me, and then the color choices are mine. In a moment you can see the final result below, once I'd had time to mull this one over. I hope you can see what I added. The piece was done on one of Romi's hexagonal tiles, which are available on her website (see the link at the top of this email). She has them made from high-quality card stock and they are very smooth and accept colored pencil well. They are also larger than the standard Zentangle® tiles (made from Fabriano Tiepolo printmaking paper, softer and tooth-ier). The two most recognizable tangles here are Pokeleaf and Crest, along with a Zengem. My finished piece is below, and then below that one you can see the gorgeous result of my friend's work. Two identical tiles, drawn by two different people, with two completely different coloways.  Above is the completed version of the one I did. Below is the tile done by AE in the same class. We were drawing together during class, hearing and seeing the same instructions. Yet if you look you'll see slight differences in mine (above) and hers (below). Zentangle® is just like handwriting. The same tangle drawn by two different people will always be a little (sometimes a lot) different.  Drawn and colored by my buddy AE. This was her first-ever ZenGem! Didn't she do a terrific job on it and on the whole tile--and these aren't her usual colors, just the colors she had with her to choose from. Photo credit to AE, used with her permission. But wait--there's more. She also decided to take up punch hooking and got her equipment together while she was here, designed a piece, and began punching. I can't wait to see what she produces.
The good news for me is that I think I'm about to start work on another rug and have something textile-related to show soon. It's been too long. It occurs to me that this has turned into a Zentangle® blog and has not showed any of my textile work recently. That's because there hasn't been any textile work recently. I've temporarily lost my textile mojo. Maybe because it's summer, and who wants to work with wool in the summer...but I am starting to get concerned. Ok, enough of that. Let's just hope inspiration returns. Last night I did a quick tangle based on the Project Pack 06 Day 5, which was great fun. It was so late when I did this that my hands were shaky but that's alright:  Tangles: "Melting Mooka," a new one for me, Shattuck, Nzeppel, and Printemps. That version of Mooka, discovered by Julie Willand, CZT, was hugely fun, although I need more practice with it. I think my version/attempt should be called "Black-Capped Melting Mooka" for the little caps I added to it. I am looking forward to playing with it more. This evening I took an online class with Romi Borax Marks, CZT, also known as The Tangled Yogi. She is all about color and is an excellent teacher, as I've been saying an my recent posts. Here is the result.  Prismacolor pencils, Uni-Ball Signo White Pen, Micron PN and a hexagonal tile from Romi Marks. That was the first time I worked on a hexagonal tile--they are all the rage right now in the Zentangle world. I enjoyed it (especially for the smooth tooth of this particular paper) but am not sure what all the fuss is about yet. I need to experiment with them more. Happy to have had a chance to try one, though.
Yesterday I asked my neighbor if she knew what the flowering, beautifully scented bush was in our front yard (we didn't plant it) and she said yes: Clethra. I thought she said "plethora" and assumed she was referring to the high number of fabulous blossoms. But no, she was naming Clethra alnifolia, also known as the sweet pepperbush or "summersweet." I love that last name. Summersweet is incredibly seductive to honeybees and butterflies, both of which I've seen--a "plethora" of them--since it began to bloom a few weeks ago. And the scent...oh, the scent is so lovely. I feel honored to be in the presence of this plant. I remember it bloomed the first summer I moved here, but not last year. What a treat to have it make such a big comeback this year. Here's a blossom from our front yard. 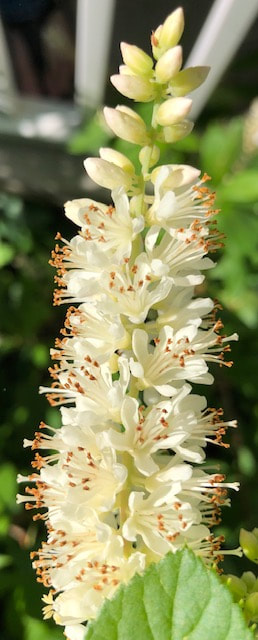 Clethra alnifolia, aka summersweet or sweet pepper There were so many honeybees and other cuties drinking from the flowers that I'm surprised I didn't have to beat any of them back to get this photo but this one stem was not being worked just as I snapped the shutter. Lots of Monarch butterflies and other butterflies around it also this year. It's a good year for the Monarchs around here--god knows they need a good year. And the bees as well. Advice from a Honeybee Create a buzz. Sip life's sweet moments. Mind your own beeswax. Work together. Always find your way home. Stick close to your honey. Always bee yourself. --Ilan Shamir 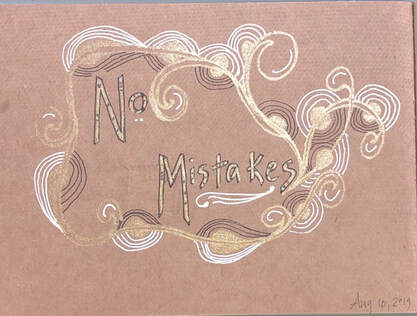 Inside the front cover of my Zentangle® Project Pack 06 book, which I've been working on in the last few days. The theme of the Project Pack is the Zentangle slogan, "No Mistakes." Black Micron 01, gold gellyroll, white gellyroll.  From my Zentangle Project Pack 06 book, Day Three. I hasten to say here that I am simply following along with the Project Pack videos as I draw, so these compositions are copies of what is on the videos, not my original compositions. 99% of what I post here is original to me, but sometimes, when I don't have the mojo--which has been happening lately for unknown reasons--it's just so relaxing to follow along and copy-to-learn-from someone else's work. I always attribute the work to the originator, as I've done here and for my last several posts.
I am definitely--and very oddly--still off my game, but I did manage to produce this today: 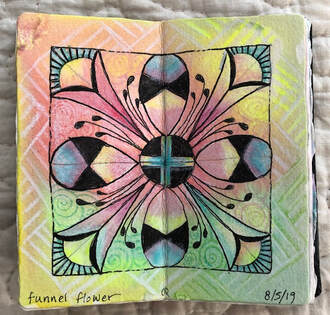 Tangles are: Funnel Flower, Fescu, Flux (all the Fs!), Printemps, and a flattened form of Shattuck. I would love to take full credit for it, but the truth is that while I did indeed draw this, I was really just following along with a video on YouTube by Romi Borax Marks, CZT. She has a lot of videos and they are all worth watching. I needed to be totally brainless-but-focused and her video did the trick. Don't get me wrong: SHE'S not brainless! I am the temporarily brainless one. I needed to be "one of the herd" today, and not have to think about anything.
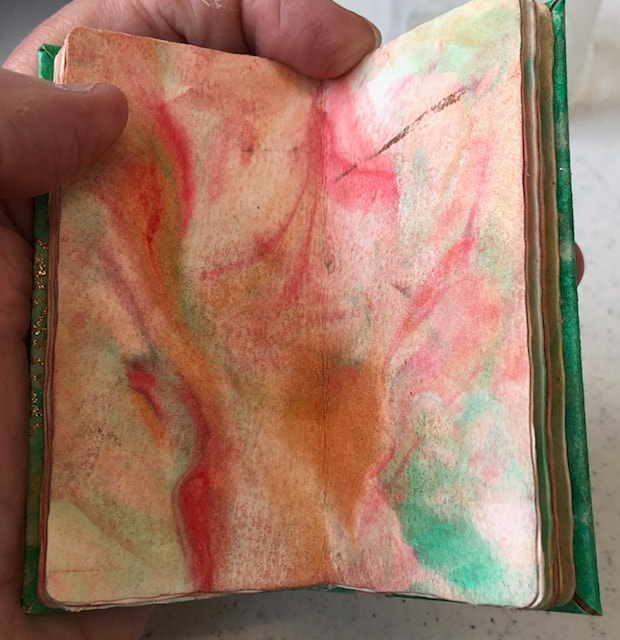
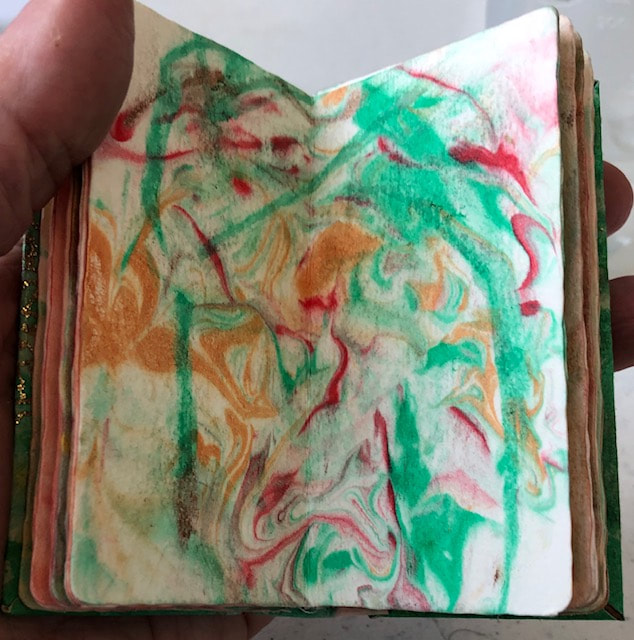
I had to vary my materials quite a bit from what she uses, and that did require some creativity. For example, all the color on her video is applied with colored pencils. On mine, I first applied art tissue paper in order to prep the tile before I bound it into a Bitty BookZ™ so the color was already there and thus I had to use colors I'd chosen weeks ago; I did punch them up a bit with Prismacolor pencils. In addition, Romi uses very smooth tiles that she produces and sells, whereas my tangle was done on traditional Fabiano Tiepolo printmaking paper (i.e., the regular 3.5" Zentangle® tile) which has a lot of tooth (not smooth). So in the end there was a big difference between her process and mine. Why I am feeling so creatively stymied is a big question, and I expect I'll understand it eventually but in the meantime I am just attempting to make a quiet and easy "comeback" with completely non-stressful work. There's not much that is less stressful than working alongside an excellent video done by an excellent teacher. I highly recommend Romi's videos. Actually, make that utter shock. I went to Elaine Huffman's studio today for a "Bitty BookZ™ maker event," thinking I would pick up a lot of tips from those more experienced. Imagine my surprise when I discovered none of the other 5 participants had ever made a bitty book. I was even more surprised to end up in the role of teacher for this group. Without any planning or rehearsal. ("Planning" and "Rehearsal" are my two middle names.) Elaine could have taught the class--but she gave us her studio for the day plus fabrics and all the other supplies...and while we worked, she was madly cutting things for us in the background. Without Elaine, none of this would have happened. So what did happen? This: 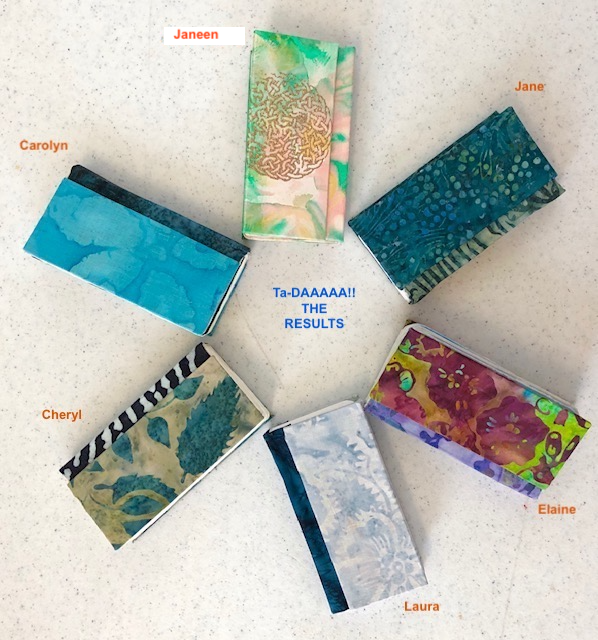 These are the finished FIRST-EVER BOOKS from all five participants, plus Elaine's. Pretty impressive! And below is a view from the side, so that you can see them slightly open:  These are just stunning. What a talented group. See below for a couple of pictures of the books as they move thru the stages of creation: 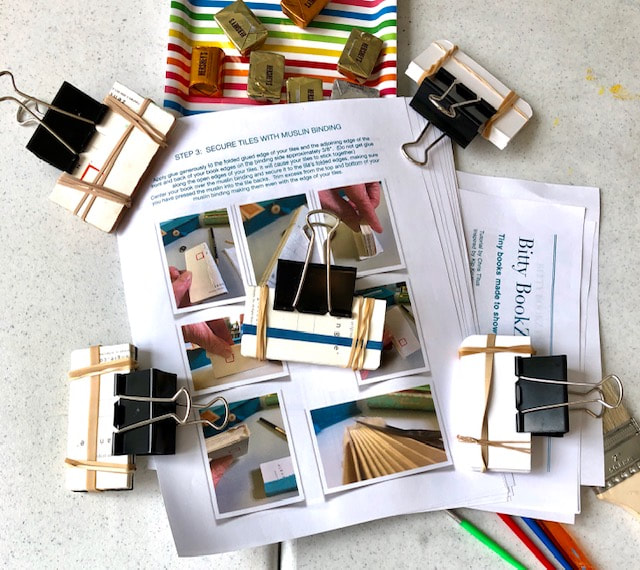 First stage with the tiles just glued together and clamped for a bit to dry. They are sitting on Chris Titus's helpful pdf of directions. See below for where to get her pdf if you would like to try one. And yes, those are chocolates at the top of the photo. Surprisingly, people were so absorbed that I never saw anyone eat one... On to the next stage: 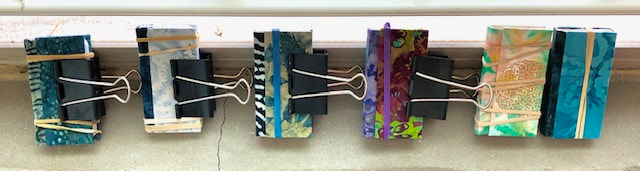 Nearly finished books on the windowsill in the studio, clamped & "elastic-ed" in order to dry. Nearly finished books on the windowsill in the studio, clamped & "elastic-ed" in order to dry. And here below we have the entire group after their books were dry and we got to un-clamp and un-elastic them. From left to right are: Janeen, Jane, Carolyn, Cheryl, Laura, and the scamp at the bottom in the violet shirt is Elaine herself. Elaine deserves huge applause for enabling this to happen. 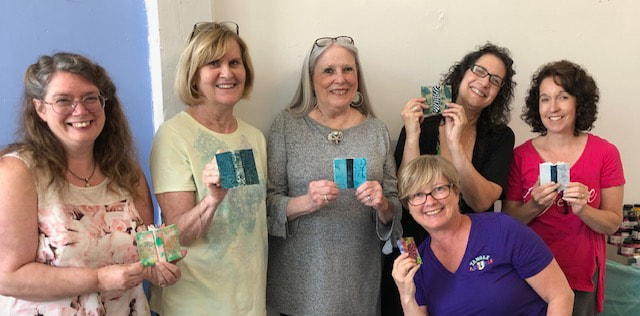 Interested? If you'd like to try it yourself, you can get Chris Titus's very helpful pdf describing what supplies are needed and how to do these from start to finish. Click HERE to get the pdf ($10 US funds...well worth it). You really CAN do this without a class, just from the pdf. Take it slow, expect some mistakes along the way, and don't expect perfection from your first one. But by the time you make the 2nd one, not only will it go faster, but you'll have it totally figured out. Meanwhile, Janeen (a Certified Zentangle Teacher from Seminar 3!!!) filled her Bitty Book with ten of her own paper pages which she had made using the ever-popular "Shaving Cream" method of coloring and marbleizing the paper. It's all over YouTube--just type in shaving cream + paper. Here are a few of her tiles (now inside her beautiful book):
 Just waiting to be tangled! Janeen had a funny story about wanting to show her grandson how to color papers with the Shaving Cream method. Except, her grandson had been doing it for years in his school and HE ended up giving HER tips and hints.
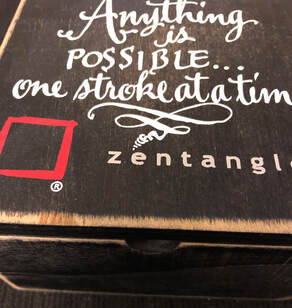
Of course, you can use plain white or black or tan tiles for your own book, or you can take your already-completed tiles (ones you've already tangled) and use those for your pages. The possibilities are endless. There is a Facebook page for BittyBookZ (oriented towards people who do Zentangle®); it's a closed group but you can ask to join if you want to join the fun. The top of the 6-sided box I've been working on is finally tangled, and I've sprayed the entire thing with fixative. All that's left is to add a button for closure. Here's the top.  I went outdoors after dark last night and was mesmerized by the bountiful fireflies everywhere in my front yard. Although I hadn't meant to, I stayed for over half an hour watching them as they danced in the dark. So very lovely. In their honor I added some white dots in the background on the top of the box, and also some dark dots on the right side of the top which is lighter in color. To view a quick, lovely video on fireflies dancing, go HERE. Don't miss it. The box, which really isn't that big (perhaps 8" x 1"?) took forever to tangle as I worked my way along all 6 sides. The paper actively resisted the ink, and it was awkward to tangle because of the shape. But I think it will be quite functional as soon as I add that button. I won't be making another one soon, however. *** Yesterday must have been a good day for me as I also finished a Bitty BookZ™ version for Zendalas (see the last few posts for the link to more information on Bitty BookZ). Here is the final result on that. I'm quite pleased.  Zendala Bitty BookZ™ with paper binding and covers. Ten Zendala tiles are folded in half inside. I'd better get busy tangling!  Showing the book placed face-down and open flat. “Catch fireflies in flight, crinkle grass under your toes and know that you are always beloved always beautiful .... a dream within a dream.” Oh, I am having way too much fun making these. I've made seven in the last two days. Fortunately I'll be busy with other obligations the rest of the week and am forced to stop. 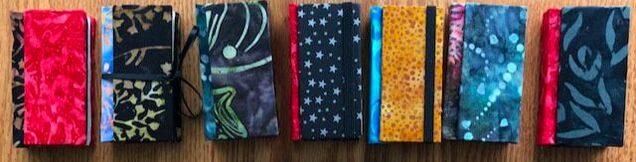 These books are 1.75"x3.5" (4.4cmx9 cm approx). Cloth, paper, glue, chipboard, and some have ribbon or elastic closures. 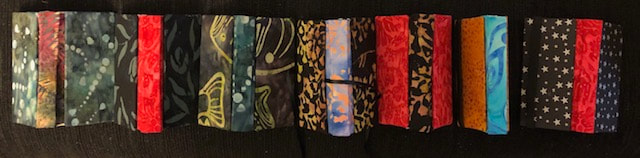 Here are the books with covers opened and spines exposed. When fully opened, they're completely flat and should be very easy to tangle on. I can't wait to try. Someone online pointed out that these Bitty BookZ™ fit well in the old (no longer available) wooden box with the Zentangle® motto on the front. I've never known what to do with this box but this answers the question. I love it as a storage container.
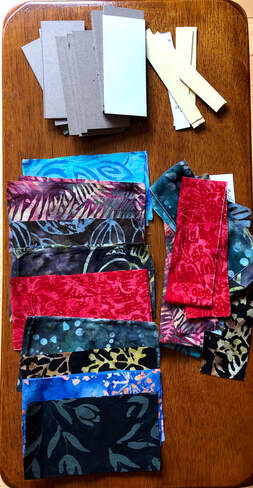 And finally, this was some of the pre-book binding preparation mess. All cleaned up now, thank goodness. I'm not the only one obsessed with this, but wow, it took over my life this week! "It is surely a great calamity for a human being to have no obsessions." --Robert Bly Just what I need. Another hobby. Oh sure. The only way I can justify this one is to say that I'm surprised at how well these things actually show off Zentangle® tiles. Or would if I ever got good at making them. Today's version was so badly bungled that I won't even go into the story, but it turned out sort of ok. I made the most of what started out as a "right-royal mess," as my friend Vivienne used to say. 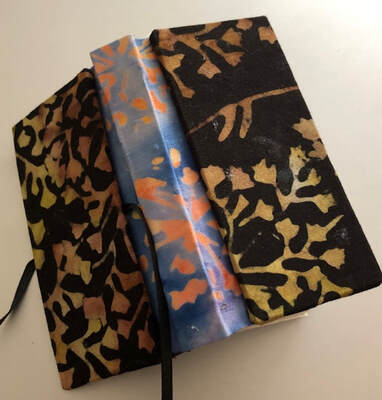 My 2nd try at this. 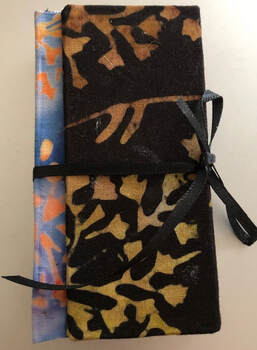 I added a simple ribbon. Easier than I thought it would be. 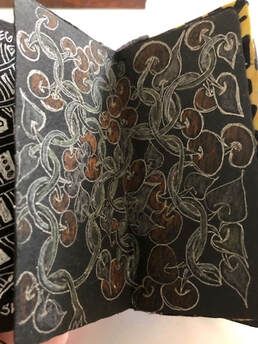 Just to show how the tiles look in the book (the book actually lies flat quite well, but it was still damp when I opened it to take this photo so I decided to allow it to be only partially open). This is a tile from January of this year. Not only that, but a bunch of cotton quilt scraps arrived in the mail from my kind friend Elaine J. Huffman. Free! And mostly gorgeous batiks. She is clearly enabling this addiction. Thank you Elaine...I have 4 more books in the works already, thanks to your gift. Clearly it pays to know a talented quilter. See below. 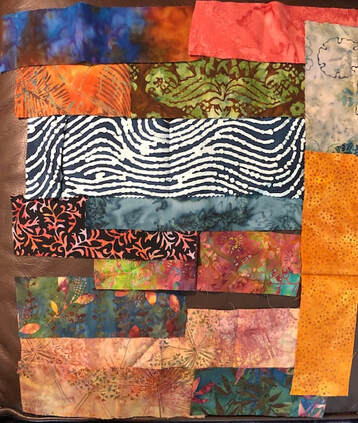 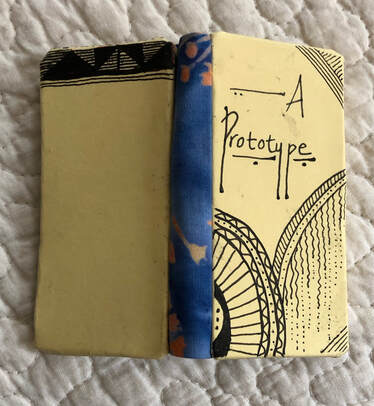 My first "BittyBook," complete with some pretty major errors. Still cute though. My first "BittyBook," complete with some pretty major errors. Still cute though. On the left here is my hilariously inept first attempt at making a "Bitty BookZ™," a tiny book of Zentangle® tiles, invented by Chris Titus, CZT. Trust me, these can be truly gorgeous. But not this one! Chris doesn't have a website so I can't link you to her beautiful work with her own Bitty BookZ™. My aim was to learn the process today, nothing more. The point was to build one prototype in which to make all the errors I was sure I would make, and then from here on I can actually create some nicer books. I hope. These Bitty BookZs are created with ten 3.5" tiles, so I started by picking out ten of my very earliest tiles from years ago when I was first learning to tangle. These are tiles that show where I was when I was learning, and some of them are...shall we say...uninspired. But it's always great to have my own early tiles to show students when I teach. So I used almost all old tiles for the prototype. See below to see the tiles in their new roles as pages in my finished book.
For some reason I was really apprehensive about trying this. And I did make some hilarious errors. For example, when I glued the paper on the front cover I got glue on the "right side," and then I had to do some tangling over it to cover up the worst of the mess. It's still a mess in some of the blank spaces on the cover, just look. But the cover paper on the back side was the worst mistake--I didn't look at it before applying glue, and discovered to my horror that I had glued all over the right side and therefore exposed the wrong side, which had commercial printing on it. But...in true "There are no mistakes" Zentangle fashion, I tangled across the top to cover up the printing. That's why there's an odd dark horizontal strip across the top of the back cover. And then there was the cover-paper in general--I used card-stock for the covers. Whoa, never again! Too stiff. What was I thinking? Fortunately I have thin decorative papers and lots of fabric scraps for the next Bitty BookZs I make, which should render the entire process so much easier. Live and learn. All in all, I'm glad I worked up the nerve to try this on my own. "My mistakes are my life." --Samuel Beckett 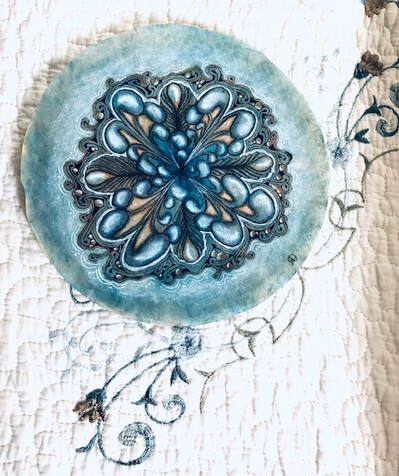 Tangling on a tan coffee filter with a blue watercolor wash (prepped by Cheryl Cianci, CZT, after she first used the filter to make her coffee, rinsed it, and put the wash on it; then dried it--Thanks for doing all that prep work Cheryl!). Tangles are Mooka, and a variation of Flux, as well as the embedded letters technique without any letters. PN Blue Micron, General's Pastel Pencils, White Gellyroll, Prismacolor Pencils. I managed to avoid all the other things I was supposed to be doing today when I heard that my friend Cheryl Cianci, CZT, was offering her coffee-filter class again. I only discovered this at the very last minute and raced out the door hoping to make it on time. I had taken the class about 4-5 years ago but my experience of Cheryl is that there's always something new and it was utterly relaxing as usual. She is the soul of kindness, and hugely talented.
Much gratitude to all who teach. 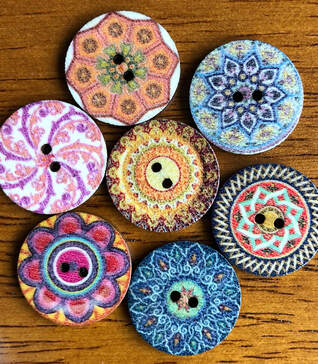 A compilation of random thoughts this fine spring morning. 1. Aren't these buttons fun? I found them online and loved them, probably because they remind me of various patterns used in Zentangle® and also of patterns used in Oriental Rugs. I'm hoping to use them in some tangling projects. And maybe one or two will inspire a rug. They are a collection of tiny mandalas. 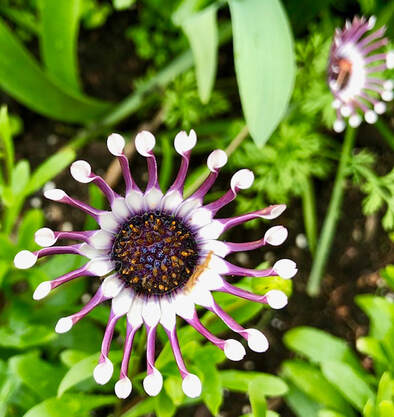 2. I spotted this beauty yesterday on a walk. Yowza! A "button"/mandala created by Mother Nature herself, and what a beauty. There has to be a tangle design (or a rug) in there somewhere. The plant goes by the unglamorous name of Osteospermum, also known as "Flower Power White." It stopped me in my tracks on my walk. Just an amazing flower; it positively glowed.  3. This is a partially-done panel on the bottom (yes, the bottom) of a tan paper box. I've been working on this for two weeks and the going has been slow because I don't have all that much time to tangle right now. Below you can see the completed design. It will probably take me another month to finish. 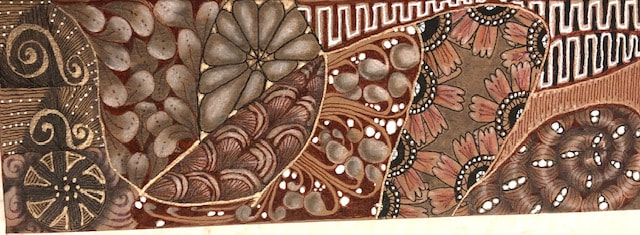 Alas, I couldn't quite get that photo above to come out straight-on, but you get the idea. 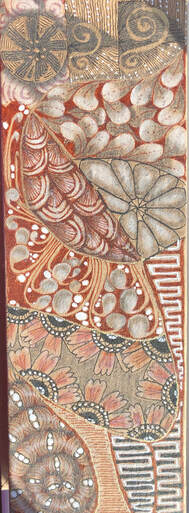 The same box, vertical photo. I still couldn't get a straight-on image. I don't have the box in front of me but I'm guessing that the dimensions are about 9" long, about 2" wide, and perhaps and inch-and-a-half tall, with a cover that flips open. I have a button to sew on when I'm done with the tangling and will use that for a closure (not one of the buttons shown at the top of this post). 4. Spring has fully sprung here and today we're having stunningly beautiful weather; up until today there have been very few sunny days and plenty of soggy ones. May all the lovely colors, sounds, and scents of spring fill your senses today. (At least in the Northern Hemisphere) Before I retired, I often wore pins as a decoration when I went to my office. But now that I spend my time in jeans and t-shirts, the pins are languishing. Here is a pin I never wore, a cameo. I love it (and used to have a much larger one which was far more lovely, but it was stolen during a break-in at my former residence) but I never wore it. Not once. I simply had it because it reminded me of some positive things from my childhood. Since it was just languishing away, I re-purposed it onto a card with some tangling. I may put it into a shadow-box frame. 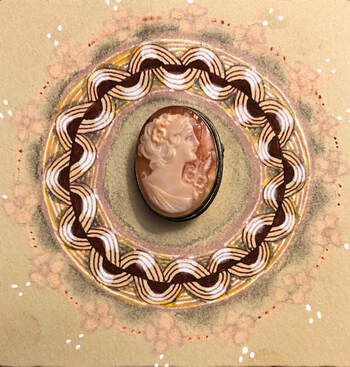 This may or may not be a genuine cameo (there are plenty of plastic fakes out there) but it doesn't matter to me. It has sentimental value.
In these troubled and challenging times, it's my deepest hope that all of us are supported by a network of unconditionally loving people in our lives. I'm defining these "beloveds" as very dear friends, mentors, and special family. Unfortunately, we are not all lucky enough to be born into families with members who end up becoming beloved. But in my family there were three people who fit this category. Today I took some time to re-frame the first of them, my beloved maternal grandmother, or Nana as I called her. She died over 50 years ago, but I think of her and send her my love and thanks to her every single day. She is never far from my mind. Oh, how I loved that woman. She taught me every good thing I have become, or hope to become. Here she is. 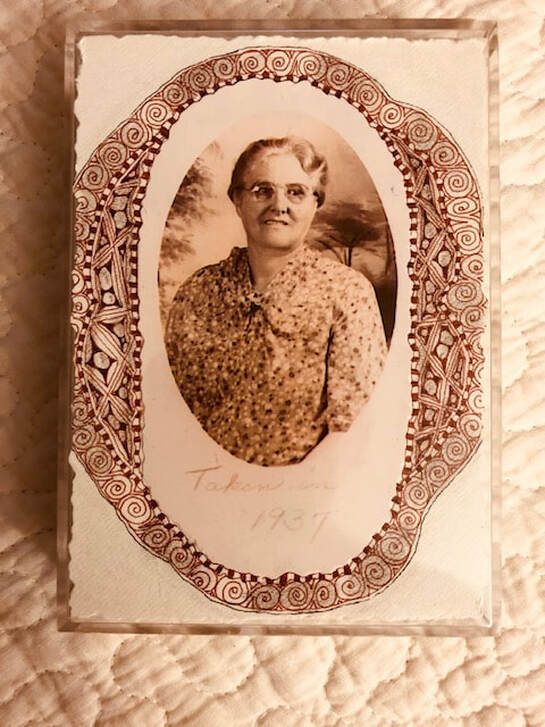 Tangles: Knightsbridge, Hollibaugh with Bales and Orbs. Brown Micron 01 and graphite. The photo was taken in 1937 when she was about 60. I have only two photographs of her because she absolutely hated having her picture taken. As a young adult I was shocked to discover that she'd gone through our family photographs and cut her own face out of every one of them. I never had the chance to ask her why she did this, and it puzzles me to this day. My understanding is that she was forced to quit school around age 12 in order to go to work, and later on she raised a large family single-handedly after her husband became extremely ill and was hospitalized for decades. She had a lot of shame about her lack of formal schooling. And yet, she was the kindest, funniest, most loving and smartest person in my childhood, and created a strong family foundation for me. She lived with us until her death when I was about 16. Lucky me! I got to spend every day with her for sixteen years. I never stop asking myself how I was fortunate enough to have her in my life. Rest well, Nana. And thank you. I have managed to grab a few minutes here and there for some creative work, which feels wonderful. Not enough, however! Here are some of the things that have been accumulating. 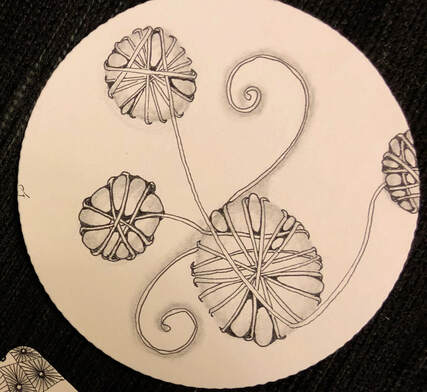 This is the result of a short voice-guided meditation class with Molly Hollibaugh of Zentangle®. She took us through three voice-guided tiles last Saturday in a two-hour workshop. This tile was the first one that we did. All of us heard the exact same verbal instructions, yet look at the mosaic below--it's always so interesting to see how people interpret things on their own.  ...and this is only part of the total mosaic. You can see my tile in the 2nd row from the bottom. But again, we all were paying close attention to her voice-guided instructions, and look at the differences. So very interesting! 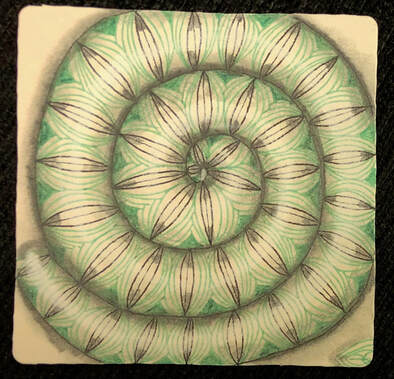 Same class, second voice-guided tile. We were encouraged to use a colored pen and a black pen for this one. It was fun to hear how Molly guided us to create this design using only her voice, no visuals. The resulting mosaic is below.  ...once again proving how different we all are. I think this is utterly fascinating. Drawing really is like handwriting. There will always be differences, and vive la difference! 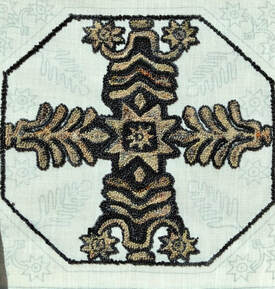 On a totally other track, I am doing some punch needle embroidery and here is the progress on the piece so far. The entire piece is about 9"x9" and you can see the start of it in my previous post. It is very different than the one I did exactly a year ago (same piece, different colors and I did it in cotton last time; this is wool). It feels so good to sneak in some creative work. Makes all the difference to me... My kind friend (and fellow Zentangle® enthusiast), Susie Ng from Thailand (check out her fabulous, imaginative artwork HERE), just sent me this photo below. She took my single 3-Z tile from my February 22nd post, multiplied it, and manipulated it into this hexagonal mandala. Thank you, Susie! I'm assuming you used Photoshop, which I don't have. Though I keep meaning to look into it. What fun!  My 3-Z triangular tile from my Feb. 22nd post, duplicated and arranged into a hexagon by Susie Ng. What a nice thing to do for a fellow tangler, Susie. You gave me a big chuckle on an otherwise crazy day. Now...I have to look into software that will allow me to do this.
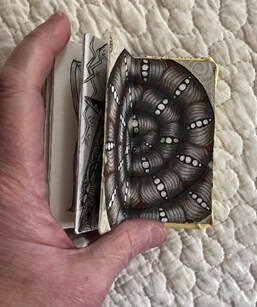
In the style of one of my idols, Mori Yuzan, a Japanese artist who lived in the late 19th and early 20th century: 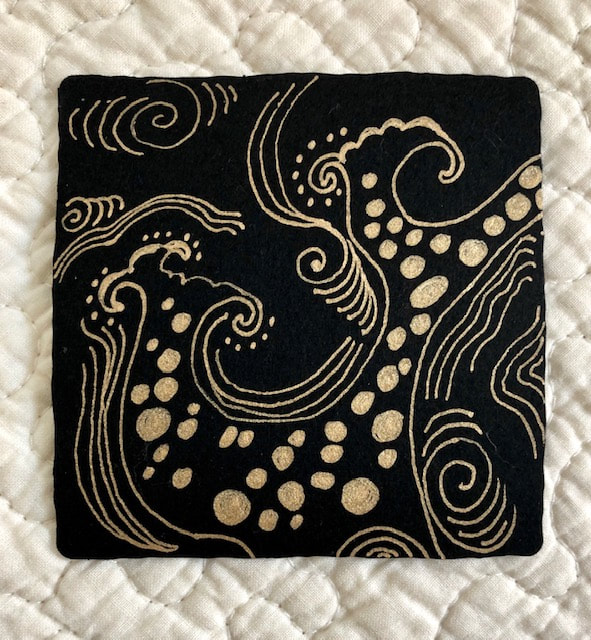 Gold gellyroll on a black tile.  Gold gellyroll pen and blue chalk pencil on a black tile. Yuzan's work has always been irresistible to me because of the linework. Wave after wave. and so many tangles (not that he would have thought of them that way). Both of the above tiles are nearly copies - if not outright copies - of his spectacular work, which fortunately is now int he public domain. So relaxing to draw these and hopefully learn a bit from him.
Both were done for Zenuari2019 day 14, "idol tangle." I think I'll be doing a lot more idol tangles! |
ABOUT ME I'm a textile artist (traditional rug hooking, punch needle rug hooking, and other textile arts), a long-time meditator, a certified meditation teacher and coach, and focused on learning about the interplay of art, creativity, and mindfulness every day. 
Certified, 2021

Certified Zentangle® Teacher, 2013
Certified by AmyOxford.com at The Oxford Rug Hooking School, 2016

Categories
All
Archives
March 2024
SITES TO WATCH:
Insight Meditation Society Oxford Rug Hooking School Zentangle: The Official Site Green Mountain Rug Hooking Massachusetts Tarot Society 
|
 RSS Feed